


Installation, Operation, and Maintenance Manual # 509252 Rev R 83
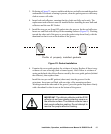
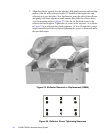
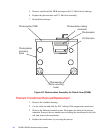
3. Referring to Figure 23, remove and discard the two end reflectors and the gaskets
underneath. If evidence of arcing is present, clean the gasket grooves with emery
cloth to remove all oxide.
4. Insert both end reflectors, ensuring that they both seat fully and evenly. The
replacement end reflectors must be installed before installing the new bulb and
reflectors and the new RF Gasket.
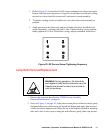
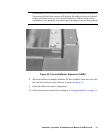
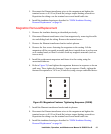
5. Install the two pre-cut (long) RF gaskets into the grooves for the end reflectors.
Insert one end flush with the top of the mounting surfaces (Figure 22). Working
toward the other end of the groove, press the gasket strip down firmly with the
thumbnail so that it rests at the bottom of the groove.
Figure 22. Gasket Installation
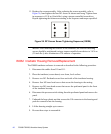
6. Examine the cross-guide gaskets for evidence of arcing. Replace if there is any
evidence of wear or arcing (dark or burned spots). Also if there is evidence of
arcing on the back side of the reflector caused by the cross-guide gaskets (behind
the reflector), then replace them.
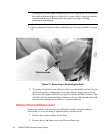
Install the two pre-cut RF gaskets (short ones) into the grooves for the
extrusions. Insert one end flush with one edge of the mounting surfaces.
Working toward the other end of the groove, press the gasket strip down firmly
with a thumbnail so that it rests at the bottom of the groove.
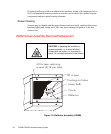
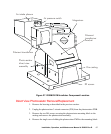
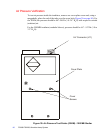
IMPORTANT: The dichroic reflector and the R350
reflector do not have plastic protective covers on
the reflector surface. The dichroic reflector has a
dark purple reflective coating. Do not attempt to
remove the purple reflective coating.
Profile of properly installed gaskets