


Maintenance
4–14
760A / 760D / 760N
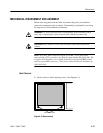
2. Grasping the bottom of the bezel, pull out and upward. The bezel has two
hinges that hold the top in place that need to be cleared.
3. To replace, reverse the procedure.
1. Remove the bezel, following the preceding procedure.
2. Using a pair of needle nose pliers, gently grasp the graticule light and
carefully pull straight out.
3. The light is replaced by carefully lining up the holders with the round pins
that they are to be inserted into. Use the needle nose pliers to lock them
back into place.
4. Replace the bezel.
1. Remove the bezel.
WARNING. The CRT may retain a dangerous charge. Ground the conductor of
the anode to discharge the CRT. Do not allow the conductor to touch your body
or any circuitry.
2. Slide a screwdriver with an insulated handle under the anode cap on the side
of the CRT, and ground the anode to the chassis, to discharge the CRT. DO
NOT touch the metal shaft of the screwdriver while doing this. Disconnect
the anode cap by prying it gently away from the CRT.
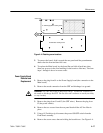
3. Disconnect P419 (trace rotation) on the Main board and push the connector
through the hole in the board.
4. The CRT can now be pulled straight out (some pressure may be needed).
The CRT shield, along with the grommet around its front and the rubber
manchet around its back, should come out with the CRT.
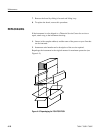
1. If the CRT is to be replaced, remove the metal shield from the neck of the
old CRT and place it around the neck of the new CRT, with the WARNING
sticker towards the top of the instrument. This should place the opening in
the grommet on the front edge of the shield towards the bottom of the
instrument. Ensure that the rubber manchet is on the back edge of the shield.
Graticule Light Removal
and Replacement
Removal of the CRT
Replacing the CRT