


Part No. 1052712 Rev D 49 Terminator SS
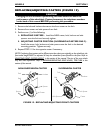
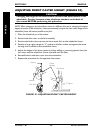
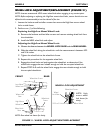
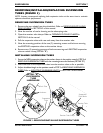
FIGURE 4 - ANTI-TIPPER REPLACEMENT/ADJUSTMENT
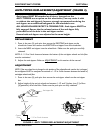
1-1/2 to 2-inch clearance
Anti-tipper
Release Buttons
Anti-tipper Bar
Anti-tipper Socket
Camber Clamp
Hole
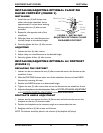
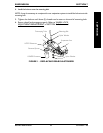
ANTI-TIPPER REPLACEMENT/ADJUSTMENT (FIGURE 4)
WARNING
Anti-tippers MUST BE attached at all times. Inasmuch as the
ANTI-TIPPERS are an option on this wheelcahir (You may order it with
or without the anti-tippers), Invacare strongly recommends ordering the
anti-tippers as an additional safeguard for the wheelchair user.
ALL WHEELCHAIRS EXCEPT X-TERMINATOR - Anti-tippers MUST be
fully engaged. Ensure the the release button of the anti-tipper fully
protrudes out of the hole in the anti-tipper socket.
Ensure both anti-tippers are adjusted to the same height.
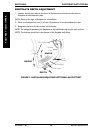
REPLACEMENT
1. Press in the two (2) push pins that secure the EXISTING anti-tipper to the
wheelchair frame and remove the EXISTING anti-tipper from the wheelchair.
2. Insert the NEW anti-tipper into the wheelchair. Make sure the push pins are fully
released.
NOTE: A 1-1/2 to 2-inch clearance between the bottom of the anti-tipper wheels and the floor
must be maintained.
3. Adjust the anti-tippers. Refer to
ADJUSTMENT in this section of the manual.
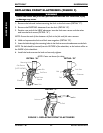
ADJUSTMENT
NOTE: If the rear wheel size is changed or the position of the adjustable axle camber bar is changed,
the anti-tippers MUST be readjusted to maintain a 1-1/2 to 2-inch clearance between the bottom of
anti-tipper wheels and floor.
1. Press in the two (2) push pins that secure the anti-tipper wheels to the anti-tipper
bar.
2. Adjust height of the anti-tip wheels to between 1-1/2 and 2-inches (one [1] of four
[4] positions) off of the floor. Make sure the push pins are fully released.
SECTION 6FOOTREST/ANTI-TIPPER
FOOTREST / ANTI-TIPPER
Ground
/Floor