


52
8. Operation
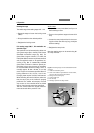
Rotating the stage
The swivel range of the rotating stages is 0° - 110°.
• Rotate the stage to loosen the locking screw
(59b.1).
• Bring the table into the desired position.
• Retighten the locking screw.
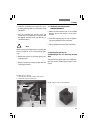
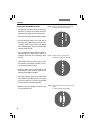
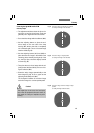
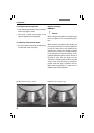
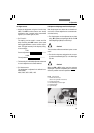
Pol rotating stage (360°)*, Pol attachable me-
chanical stage *
The specimen can be fastened using either two
spring-back stage clips or the Pol 3 multi-format
attachable mechanical stage (Fig. 59a). For
glass slides of approx. 26 mm (1") in width, the
metal plate (59a.2) needs to be pivoted outwards
and the specimen needs to be positioned ac-
cording to Fig. 59a. If commercially available
glass slides of 26 mm in width are placed per-
pendicular to that, then the range of movement
of the attachable mechanical stage, which is
normally approx. 30 mm x 40 mm, is not fully
used. The pair of lock buttons provided allow for
locking distances of 0.1, 0.3, 0.5, 1 and 2 mm.
Changing them requires forceful, axial removal.
When attaching the new lock button, make sure
that the catch pins on the inside are properly
positioned. For smaller microscopes, the limit
stop screw on the underside must be shifted
approx. 2 mm inwards toward the stroke limit.
The two verniers allow the angular measure-
ments to be read with a precision of 0.1.
45°click stop:
• Screw in the rotary knob (59a.5) until you can
feel it starting to resist.
• Then turn the specimen stage to the next click
stop.
• Loosen the rotary knob and look for the start-
ing point of the next click stop (e.g., the object
darkness setting).
• Retighten the rotary knob.
Now the rotating stage can be turned using 45°
click stop intervals.
Fig. 59a Pol rotating stage* and Pol 3 attachable mechani-
cal stage*
1 Holes for the fastening screw.
2 Lever for the holder for glass slides of various formats,
which can be turned inward and outward
3 Storage for the centering key
4 Locking button pair
5 45° click stop
6 Clamping system for the stage rotation
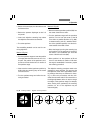
1
2
3
5
6
4