


SECTION 10—ANTI-TIPPERS/WHEEL LOCKS
Part No. 1073955 65 Orbit
™
SECTION 10—ANTI-TIPPERS/WHEEL
LOCKS
ƽ WARNING
After any adjustments, repair or service and before use, make sure all attaching
hardware is tightened securely. Otherwise injury or damage may occur.
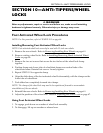
Foot Activated Wheel Lock Procedures
NOTE:Forthisprocedure,refertoFIGURE 10.1onpage66.
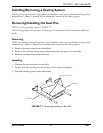
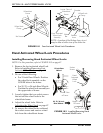
Installing/Removing Foot Activated Wheel Locks
NOTE:Footactivatedwheellockscanonlybeusedwith12‐inchrearwheels.
1. Remove therearwheels.RefertoRemoving/InstallingRearWheelsonpage 61.
2. Remove existingwheellocks.RefertoInstalling/RemovingHandActivatedWheel
Locksonpage 66.
3. Remove thetwosetscrewsthatsecurethetwohalvesofthewheellockclamp
together.
4. Positionclampontolowertubeofwheelchairframenearverticaltubeofthe
wheelchairframe.Reinstallsetscrews.Looselytighten.
5. RepeatSTEPS1‐2foroppositeclamp.
6. Alignthesliderbars,ofthefootactivatedwheellockassembly,withtheclampsonthe
lowertubeofwheelchair.
7. Pushsliderbarscompletelyforwardintoclamps.
NOTE:Theclampsofthewheellockmayneedtoberepositionedforwardtoaccommodate
reinstallationoftherearwheels.
8. Reinstalltherearwheels.RefertoRemoving/InstallingRearWheels
onpage 61.
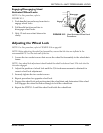
9. Adjustthepositionofthewheellock.RefertoAdjustingtheWheelLockonpage 67.
Using Foot Activated Wheel Locks
1. Toengage,pushdownoncrossbarofwheellockassembly.
2. Todisengage,liftuponcrossbarorreleaselever.