SECTION 9—REAR WHEELS
Part No. 1073955 61 Orbit
™
SECTION 9—REAR WHEELS
ƽ WARNING
After any adjustments, repair or service and before use, make sure all attaching
hardware is tightened securely. Otherwise injury or damage may occur.
Removing/Installing Rear Wheels
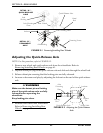
NOTE:Forthisprocedure,refertoFIGURE 9.1onpage62.
Quick-Release Axles
1. Pushinthedetentpin(tip)ofthequick‐releaseaxle.
2. Whileholdingtherearwheel,pullthequick‐releaseaxleoutoftheaxlebushing.
3. Pushinthetipofthequick‐releaseaxleagainandpullthequick‐releaseaxleoutofthe
rearwheel.
4. RepeatSTEPS1‐3fortheoppositerearwheel.
5. Toreinstalltherearwheelontotheaxlemountingplate,reverseSTEPS1‐3.
ƽ WARNING
Make sure the detent pin and locking pins of the quick-release axle are fully released
before operating the wheelchair.
The locking pins MUST be protruding past the inside of the rear wheel axle bushing
for a positive lock.
Keep locking pins clean.
6. Ifthelockingpinsare notprotrudingpasttheinsideoftheaxlebushingorthereistoo
muchmovementoftherearwheelassemblyinabackandforthposition,referto
AdjustingtheQuick‐ReleaseAxle
onpage 62.
NOTE:Duringcontactactivities,Invacarerecommendsinsertingquick‐releaseaxleswiththe
detentpin(tip)totheinsideofthewheelchairtopreventaccidentalrelease.
Permanent Axles
1. Remove themountingscrewandlocknutthatsecuretherearwheeltotheaxle
mountingplate.
2. Looselyinstallthelocknutontothemountingscrew.
3. RepeatSTEPS1‐2fortheoppositerearwheel.
NOTE:Whenreinstallingrearwheels,secur elytightenthelocknuts.
4. Toreinstalltherearwheelsontotheaxlemountingplate,
reverseSTEPS1‐2.


