


7. If applicable, remove the socket protective cap.
8. If you are adding a second processor for the first time, remove the heat sink blank and the processor blank from the
vacant processor socket.
Removing the blanks is similar to removing a processor.
9. Unpack the new processor.
If the processor has previously been used in a system, remove any remaining thermal grease from the processor
using a lint-free cloth.
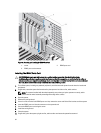
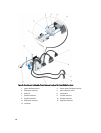
10. Align the processor with the socket keys on the ZIF socket.
11. Install the processor in the socket:
CAUTION: Positioning the processor incorrectly can permanently damage the system board or the processor.
Be careful not to bend the pins in the socket.
a. With the release lever on the processor socket in the open position, align the processor with the socket keys
and set the processor lightly in the socket.
CAUTION: Do not use force to seat the processor. When the processor is positioned correctly, it engages
easily into the socket.
b. Close the processor shield
c. Rotate the socket release lever down until it snaps into place.
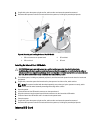
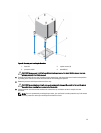
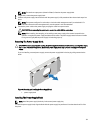
12. Install the heat sink:
CAUTION: Applying too much thermal grease can result in excess grease coming in contact with and
contaminating the processor socket.
a. Open the grease applicator included with your processor kit and apply all of the thermal grease in the
applicator to the center of the topside of the new processor.
b. Place the heat sink onto the processor.
c. Tighten the four screws to secure the heat sink to the system board.
NOTE: Do not over-tighten the heat sink retention screws when installing the heat sink. To prevent over-
tightening, tighten the retention screw until resistance is felt, and stop once the screw is seated. The
screw tension should not be more than 6 in-lb (6.9 kg-cm).
13. Install the cooling shroud.
14. Close the system.
15. If applicable, place the system upright on a flat, stable surface and rotate the system feet outward.
16. Reconnect the system to its electrical outlet and turn the system on, including any attached peripherals.
17. Press <F2> to enter the System Setup and check that the processor information matches the new system
configuration.
18. Run the system diagnostics to verify that the new processor operates correctly.
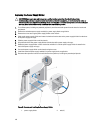
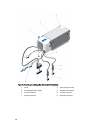
Redundant AC Power Supply
Your system may support up to two redundant 495 W, 750 W, or 1100 W AC power supplies.
When two identical power supplies are installed, the power supply configuration is redundant (1 + 1). In redundant
mode, power is supplied to the system equally from both power supplies to maximize efficiency.
When only one power supply is installed, the power supply configuration is non-redundant (1 + 0). Power is supplied to
the system only by the single power supply.
NOTE: If two power supplies are used, they must be of the same type and have the same maximum output power.
NOTE: Redundant power supplies are supported on systems with hot-swappable hard drives only.
99