


4
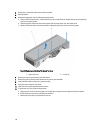
Converting The System From Tower Mode To
Rack Mode
CAUTION: Many repairs may only be done by a certified service technician. You should only perform
troubleshooting and simple repairs as authorized in your product documentation, or as directed by the online or
telephone service and support team. Damage due to servicing that is not authorized by Dell is not covered by your
warranty. Read and follow the safety instructions that came with the product.
NOTE: Only systems with hot-swappable hard drives are rackable.
Safety Instructions
NOTE: For specific caution statements and procedures, see the rack installation documentation that shipped with
your system and the rack kit. For complete safety and regulatory information, see the safety instructions that
shipped with your system.
Observe the following precautions for stability and safety of the system in rack mode:
• Your rack kit has been approved only for the rack cabinet provided. Ensure that installation of the equipment into any
other rack complies with all applicable standards. Dell disclaims all liability and warranties with respect to
combinations of equipment with any other rack.
• Before installing your equipment in a rack, install all front and side stabilizers. Failure to install stabilizers can allow
the rack to tip over.
• Always load from the bottom up, and load the heaviest items first.
• Do not overload the AC power supply branch circuit that provides power to the rack.
• Do not stand or step on any components in the rack.
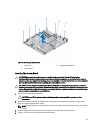
Preparing A System For Conversion From Tower Mode To Rack
Mode
You require the following items to convert your system from tower to rack mode:
• Rack ears (left and right) with three screws each
• VGA module
• Control panel for rack mode
• #2 Phillips screwdriver
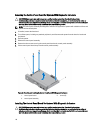
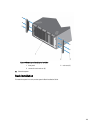
1. Turn off the system, including any attached peripherals, and disconnect the system from the electrical outlet and
peripherals.
2. If applicable, rotate the system feet inward and lay the system on its side on a flat, stable surface.
NOTE: For systems installed with the wheel assembly, ensure that you lay the system on a sturdy, stable
surface with the wheel assembly extending off the edge of the surface.
123