


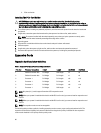


Table 4. Expansion Card Installation Order
Card Priority Card Type Slot Priority Maximum Allowed
1 GPU 3, 5 2
2 External RAID 1, 4, 5, 3, 6 1
3 Internal RAID 6, 4, 5, 3, 1 1
4 10 Gb NICs 4, 5, 3, 6 4
5 FC8 HBA 4, 5, 3, 1, 6 5
6 CNAs 4, 5, 3, 1, 6 5
7 1 Gb NICs 2, 4, 5, 3, 1, 6 6
8 Non-RAID 4, 5, 3, 1, 6 1
9 Internal tape adapter 2, 4, 5, 3, 1, 6 1
GPU Card Installation Guidelines
Observe the following guidelines while installing a GPU card:
• Ensure that the GPU cable is available.
• Ensure that all GPU cards are of the same type or model.
• Your system supports only Q4000 single-width GPU cards and Q6000 double-width GPU card.
• The two-processor configuration supports one double-width or two single-width cards on slots 3 and 5.
• For systems with a single GPU card, connect the GPU card power cable to the GPU power connector CN11 on the
power distribution board.
• For systems with two GPU cards, connect the first GPU card power cable to the GPU power connector CN11 on the
power distribution board and the second GPU card power cable to the GPU_POWER connector on the power
interposer board.
• Systems with a double-width GPU card can support only one 5.25 inch removable media storage device.
• GPU cards must be installed on a system with redundant 1100 W AC power supplies.
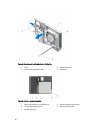
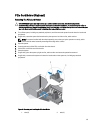
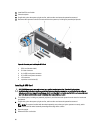
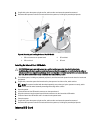
Removing An Expansion Card
CAUTION: Many repairs may only be done by a certified service technician. You should only perform
troubleshooting and simple repairs as authorized in your product documentation, or as directed by the online or
telephone service and support team. Damage due to servicing that is not authorized by Dell is not covered by your
warranty. Read and follow the safety instructions that came with the product.
1. Turn off the system, including any attached peripherals, and disconnect the system from the electrical outlet and
peripherals.
2. If applicable, rotate the system feet inward and lay the system on its side on a flat, stable surface.
NOTE: For systems installed with the wheel assembly, ensure that you lay the system on a sturdy, stable
surface with the wheel assembly extending off the edge of the surface.
3. Open the system.
4. If applicable, remove the PCIe card holder.
5. If applicable, press and disconnect the two SAS cables from the expansion card.
6. If applicable, disconnect the P3 power cable from the system board.
87