Understanding Alarm Messages 3Alarms
51
Understanding Alarm Messages
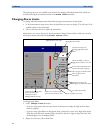
If you do not immediately understand an INOP or alarm message, refer to its help text.
♦ In the Alarm Messages window, select the INOP message. This calls up a help window with
an explanation of the INOP message and, where appropriate, a suggested solution for the problem.
Latching Alarms
The alarm latching setting for your monitor defines how the alarm indicators behave when you do not
acknowledge them. When alarms are set to non-latching, their indicators end when the alarm
condition ends. Switching alarm latching on means that visual and/or audible alarm indications are still
displayed or announced by the monitor after the alarm condition ends. The indication lasts until you
acknowledge the alarm.
Viewing the Alarm Latching Settings
To see the alarm latching setting for your monitor
1 In the monitor’s Main Setup menu, select Alarms.
2 Select Alarm Settings, and see the Visual Latching and Audible Latching
settings.
This setting can only be changed in Configuration Mode. You should be aware of the settings chosen
for your unit. There are three possible choices each for visual and audible latching, Red, Red and
Yellow, and Off. These choices can be combined to give the following settings:
R = red alarms, Y = yellow alarms
The lead LL has become detached from the
patient or the lead set has been changed.
Attach the missing electrode or select <New
Lead Setup> to confirm the new lead set
Alarm Messages
Resp LEADS OFF
LL LEAD OFF
** awRR LOW
Visual Latching
R&Y R&Y R&Y RROff
Audible latching
R&Y ROffROffOff


