


C2907M-D (4/05) 75
CONNECTING PELCONET TO VARIOUS COMPONENTS WITH ASSORTED KEYBOARDS
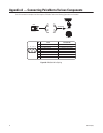
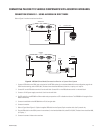
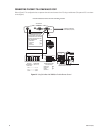
CONNECTION SCENARIO 1 – USING A KBD300A IN DIRECT MODE
Refer to Figure 51 and the instructions that follow.
Figure 51. KBD300A (Direct Mode) Connected to a Receiver or Spectra Dome System
1. Connect a DB9 cable to the COM1 port on the back of the NET350 receiver. (In the Interface Mode field on the configuration page for the
COM1 interface settings, select RS422/485.) The data format should be 4800 baud, 8 data bits, no parity, and 1 stop bit.
2. Connect RX- on the DB9 cable to terminal 2 on the wall block. Connect RX+ on the DB9 cable to terminal 1 on the wall block.
3. Connect a 12 VAC power supply to terminals 3 and 4 on the wall block.
4. Set DIP switch 6 on the KBD300A to ON to enable turbo pan operation or OFF to disable that feature. The KBD300A will recognize Direct
Mode automatically.
5. Connect the wall block to the KBD300A with an RJ-45 straight cable.
6. Connect the monitor.
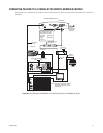
7. Refer to Figure 50 and Figure 51. Splice the supplied DB9 cable into the Spectra/Esprit or receiver cable. Use P protocol only.
8. Plug the DB9 cable into the COM1 port on the transmitter. (In the Interface Mode field, select RS-422/485.) The data format should be 4800,
8, no parity, 1.
9. Connect the camera’s video to the transmitter.
TX-
TX+
P PROTOCOL ONLY
RECEIVER OR
SPECTRA
RX+ RX-
TRANSMITTER
VideoIn
75
AudioI/O
COM2
RS232
COM1
RS232/422/485
Power
VideoOut
75
AudioI/O
Power
RX-
RX+
12 VAC
KBD300A
STRAIGHT
CABLE
DIRECT
MODE
RECEIVER
1
2
3
4
8
7
6
5
4800, 8, NONE, 1
COM2:
RS232
COM1:
RS232/422/485
4800, 8, NONE, 1