


46 C2907M-D (4/05)
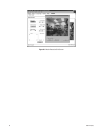
CONFIGURATION PAGES FOR MEDIA RECORDING
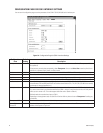
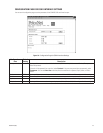
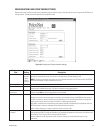
Time, alarm, and recording properties information make up these configuration pages. Use these pages to set up local recording onto the NET350
(using the CompactFlash interface). These settings let you configure your unit for different recording situations. The table that follows describes
items that appear on all three media recording configuration pages (Time, Alarm, and Properties).
NOTE: The link to these pages will not appear if the unit is powered up without a CompactFlash card inserted. The link appears only after
inserting the card and resetting the unit. To reset the unit, type a forward slash (\) and reset at the end of the unit’s address in the Internet
Explorer browser address window, and then press Enter.
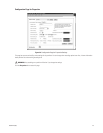
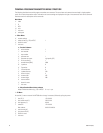
Multicast video port
encoder 1
60000 Enter the port address for the video encoder 1 MPEG-4 data stream.
Multicast video port
encoder 2
61000 Enter the port address for the video encoder 2 MPEG-4 data stream.
Multicast audio port
MPEG-4
55000 Enter any port greater than 1024 that is not in use.
Multicast packet TTL 1 Enter the number of hops for the packet to live. TTL stands for time to live. This setting defines the lifetime of mul-
ticast packages in the network. If multicast traffic is to be transmitted over routers and switches, this setting is
important in adjusting the lifetime of the package to the requirements of the network.
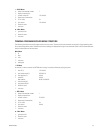
Configuration
Item
Default
Setting Description
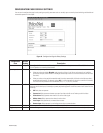
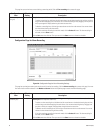
Partition selection N/A Use the pull-down menu to select which partition you want to view information about or change.
Stop/Start (buttons) N/A These buttons activate and deactivate time and alarm recording for the selected partitions. Once you click the
Start button to activate time or alarm scheduling, you cannot make changes or view other partitions until you
stop the scheduler with the Stop button.
Time/Alarm/Properties
(tabs)
Time
recording
Click a tab to select the desired recording or properties page.
Recording active N/A The disk icon spins to show that recording is taking place currently.
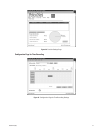
Enter partition
settings! (button)
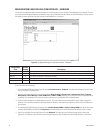
N/A Click this button (located in lower right corner) to access a screen that shows how partition resources are allo-
cated; and how much free space remains. (Refer to Figure 36.) From here you can access a wizard to set up par-
titions (eight partitions maximum can be set per hard disk), or delete existing partitions.
Add partition button: Click this button to access a wizard that lets you add, name, and designate the values
for a partition. A chart on the partition allocation screen will show how resources are divided among the parti-
tions.
Delete partition button: Highlight a partition and then click this button to remove the partition.
Click Set when finished, and then click Back to HD Scheduler page! to return to the Time Recording page.
Configuration
Item
Default
Setting Description