


34 C2907M-D (4/05)
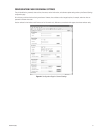
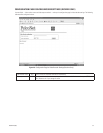
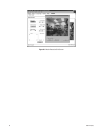
Configuration
Item
Default
Setting Description
Camera Camera 1 Enter a camera name.
Camera name
stamping
Off Use the pull-down menu to select a screen option (Top or Bottom) where the camera name will be displayed. Or
select Off.
Time stamping Off Use the pull-down menu to select a screen position (Top or Bottom) where the current time will be displayed. Or
select Off.
Video watermarking
MPEG-4
On Use the pull-down menu to select whether the MPEG-4 data stream will be stamped with a watermark (On) or not
(Off). A green rectangle will be stamped on the decoded signal of the validated data stream.
Display alarm
stamping
Off Use the pull-down menu to select whether a message will be displayed in the event of an alarm.
Displayed alarm
message
N/A Enter the message to be displayed in the event of an alarm (31 alphanumeric characters maximum).
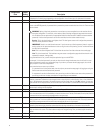
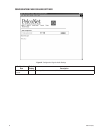
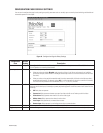
MPEG-4 Encoder 1/2
(tab)
MPEG-4 Click the tab to choose whether to set parameters for either encoder 1 or encoder 2. The Encoder 1 selected button’s
text will be bold.
Name of (first or sec-
ond) encoder
(Name of
first
encoder)
Clicking the MPEG-4 Encoder 1 or 2 tab changes the title of, and entry in, this field. If desired, enter a name other
than the programmed name to identify video 1 or video 2 (24 alphanumeric characters maximum). (Changing the
name here also changes it on the tab.)
Parameter preset 1 Use the pull-down menu to select a setting (1-8) that corresponds to a predefined profile in the Preset Parameter
Name field below. The profile changes as you change the setting. These predefined profiles are a starting point from
which you can make custom adjustments, if desired.
Preset parameter
name
high
res.
(4CIF)
This field describes the profile associated with the setting in the Parameter Preset field above. This field changes
automatically. The profiles are predefined and optimized for different transmission paths. The profiles are
1 = high res. (4CIF) for connections with high bandwidth and high resolution of 704 x 576 pixels
2 = low delay (half D1) for connections with high bandwidth and motion-optimized resolution of 352 x 448 pixels
3 = low bandw. (CIF) for connections with lower bandwidth and resolution of 352 x 288 pixels
4 = DSL for ADSL connections
5 = ISDN (2B) for ISDN connections over two B channels
6 = ISDN (1B) for ISDN connections over one B channel
7 = MODEM for modem connections
8 = GSM for GSM modem connections
(Note that QCIF does not support displaying camera name stamping, time stamping, and display alarm stamping.)
Datarate 5000 The data rate figure in this field changes automatically according to the setting you choose in the Parameter Preset
field.
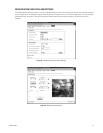
Video quality
settings
Auto This setting adjusts the value between video quality and image frame rate. Use the pull-down menu to choose either
Auto or Manual.
• If you choose Auto, an optimized value is adjusted automatically.
• If you choose Manual, you can change the value between high quality and low quality on the slide bar at the
right.
Intra frame distance 0 Enter a value to change the size of the frames within the MPEG-4 video stream.
Frame skip ratio 1 Enter a skip value for images.
• If you enter 1, all images are encoded.
• If you enter 2, every second image is encoded. Use this setting if you want low bandwidth and higher quality.
Video resolution CIF Use the pull-down menu to choose the video resolution (QCIF, CIF, 2CIF, 4CIF, or custom) for viewing and recording.
See the Preset Parameter Name field for descriptions of options.
Field mode Interlaced This setting lets you select the field mode for video transmission. Use the pull-down menu to select one of the
following:
• Interlaced – Interlaced mode on. Setting improves video quality on moving objects.
• Progressive – Interlaced mode off.
Reset this parameter
preset
N/A Click the Default button to return the settings to the factory defaults.