


22
6. Assembly
The following gas discharge lamps may be used
and require different supply units and lamp
mounts (fig. 16):
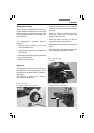
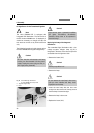
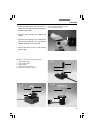
• To open the 106z lamp housing, unscrew the
fastening screws (15.8) on the cover
• Remove the transport anchorage (red plastic
rod in place of the burner) in the lamp mount;
to do so, remove the lower clamp (16.1); pull
up the cooling element (16.3) and turn it to the
side; detach the lower clamp system (16.2)
and remove the transport anchorage
• Install the burner in reverse order
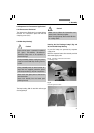
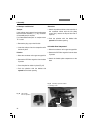
Caution!
Hg 50 Burner:
After installation, the labeling must be
upright.
If a glass melt nipple is present (16a.4), position
it by turning the burner so that the nipple does
not come in the way of the beam path later, but
instead is positioned
sideways.
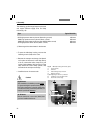
Xe 75 Burner:
Remove the burner's dust cover (16b.5) after
you have installed the burner.
1
2
3
898
4
5
6
7
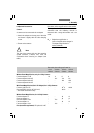
Type Typical Bulb Life
+)
50 W high-pressure mercury burner (alternating current) 100 hours
100 W high-pressure mercury burner (direct current) 200 hours
100 W high-pressure mercury burner, type 103 W/2 (direct current) 300 hours
75 W high-pressure xenon burner (direct current) 400 hours
+) Please regard the data sheets for the burners.
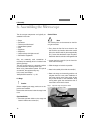
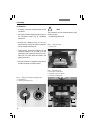
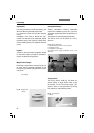
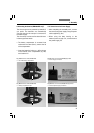
Fig. 15 106z lamp housing (on the side, open)
1 Cover (raised)
2 Collector
3 Gas discharge lamp in mount
4 Reflector (mirror)
5, 6, 7 Adjusting screw for x-y reflector
8 Fastening screw for lamp mount
9 Socket for contact plug