


45
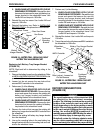
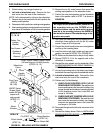
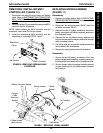
REPLACING WIRING HARNESS
(FIGURE 11)
Disassembly
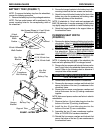
1. Remove the battery boxes. Refer to
INSTALLING/
REMOVING BATTERY BOXES in this procedure of
the manual.
2. Disconnect the wiring harness (BLUE) from the
controller connector (BLUE).
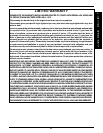
3. Remove the four (4) phillips screws that secure the
battery connectors and battery connector spacers to
the wheelchair frame.
4. Remove the two (2) phillips screws, washers and
locknuts that secure the charger cable to the charger
cable mounting bracket.
5. Cut the tie wrap that secures the wiring harness and
motor cables to the crossbraces.
6. Remove the wiring harness from the wheelchair.
Reassembly
1. Secure the two (2) battery connectors of the new
battery harness and the battery connector spacers to
the wheelchair frame with the four (4) phillips screws.
2. Secure charger cable to existing mounting bracket
on seat frame with two (2) phillips screws, washers
and locknuts.
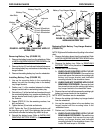
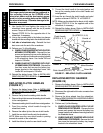
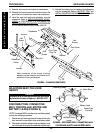
REMOVING/INSTALLING MKIV
CONTROLLER (FIGURE 10)
1. Disconnect the left/right motor leads and battery
leads. Refer to
DISCONNECTING/CONNECTING
MKIV CONTROLLER, MOTOR AND BATTERY
LEADS in this procedure of the manual.
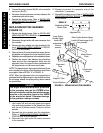
2. Remove the two (2) hex screws that secure the MKIV
controller onto the wheelchair.
NOTE: When installing the MKIV controller onto the
wheelchair, use Loctite 242 on hex screws.
3. Install the new/existing MKIV controller onto the
wheelchair by reversing STEPS 1 and 2.
MKIV Controller
Wheelchair
Frame
Hex Screws
FIGURE 10 - REMOVING/INSTALLING MKIV
CONTROLLER
FIGURE 11 - REPLACING WIRING HARNESS
Phillips
Screws
Charger
Cable
Mounting
Bracket
From Motors
Phillips Screws
and Locknuts
Wiring Harness
Battery Connector Spacer
To Controller
R
W
D
W
H
E
E
L
C
H
A
I
R
S
PROCEDURE 9RWD WHEELCHAIRS