


28
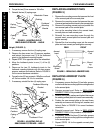
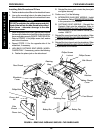
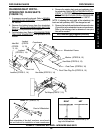
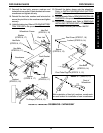
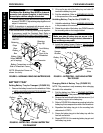
FIGURE 14 - REMOVING/INSTALLING SHROUDS - FWD WHEELCHAIRS
Front Shroud
Phillips Screws
Washers
Rear Shroud
Side Shroud
Phillips Bolts
Locknut
Wheelchair
Frame
Filler
Retaining
Strap
Retaining Strap
Battery Box
Battery Tray
Phillips Screws
Battery Charger
Cover
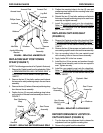
Installing Side Shrouds and Fillers
1. Position side shroud and filler on the wheelchair frame.
2. Line up the mounting holes in the side shroud and
filler with the mounting holes in the wheelchair frame.
CAUTION
DO NOT overtighten the phillips screws and phil-
lips bolt that secure the side shroud to the wheel-
chair frame - otherwise damage to the side
shroud can occur.
3. Install the phillips screws, bolts, washers and locknuts
that secure the side shroud and filler to the wheelchair
frame and tighten securely. DO NOT OVERTIGHTEN.
Refer to FIGURE 14 for phillips screw, bolt, washer
and locknut locations.
4. Repeat STEPS 1-3 for the opposite side of the
wheelchair, if necessary.
5. HIGH BACK CAPTAIN'S SEAT MODEL WHEEL-
CHAIRS ONLY - If necessary, perform the following:
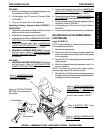
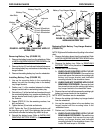
A. Position the phono jack on the side shroud.
B. Reinstall the phono jack nut onto the phono jack
and tighten securely.
6. Perform one (1) of the following:
A. INTEGRATED SLING SEAT MODELS - Unfold
the wheelchair. Refer to
TRANSPORTING EXCEL
in this procedure of the manual.
B. CAPTAIN'S SEAT MODELS - Reinstall the
Captain's Seat onto the wheelchair. Refer to
REMOVING/INSTALLING CAPTAIN'S SEAT in
PROCEDURE 9 of the owner's manual, part
number 1080737.
7. Reinstall the rear shroud onto the wheelchair. Refer
to
REMOVING/INSTALLING REAR SHROUD in this
procedure of the manual.
8. Reinstall the front shroud onto the wheelchair. Refer
to
REMOVING/INSTALLING FRONT SHROUD in
this procedure of the manual.
PROCEDURE 8 FWD WHEELCHAIRS
F
W
D
W
H
E
E
L
C
H
A
I
R
S
Phono Jack
Nut
Phono Jack
Side
Shroud