


11
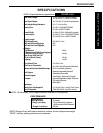
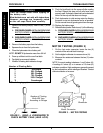
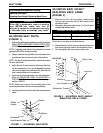
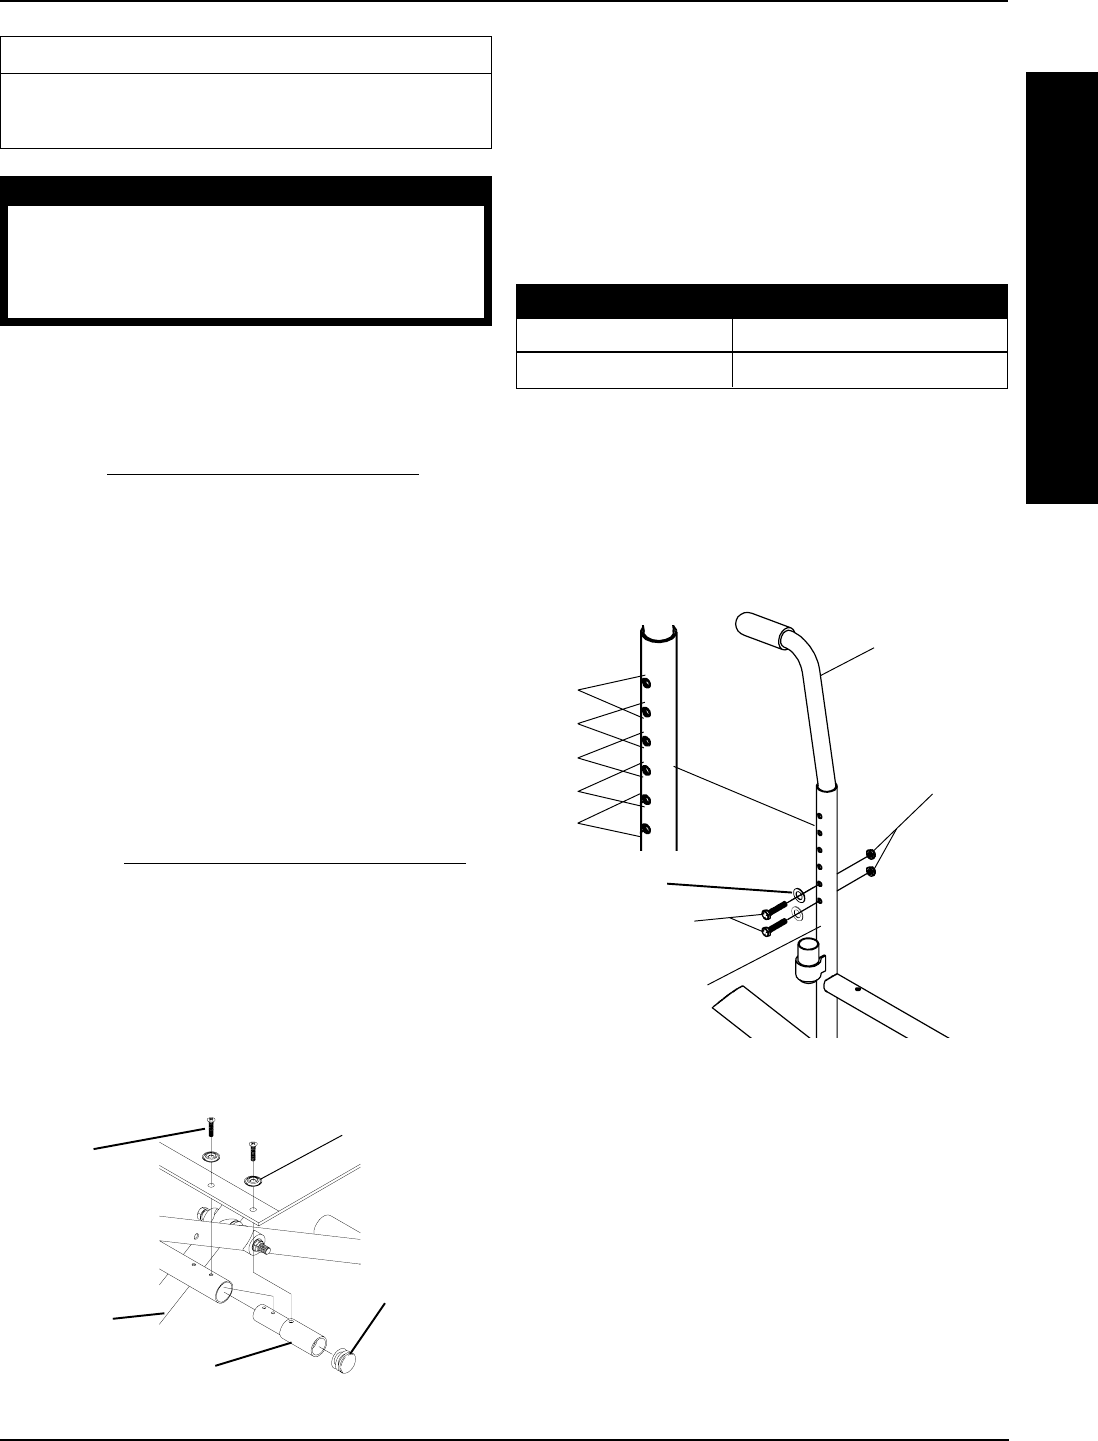
FIGURE 1 - ADJUSTING SEAT DEPTH
Phillips
Screws
Washer
Plug Button
Crossbrace
Seat Extension Tube
ADJUSTING SEAT DEPTH
(FIGURE 1)
1. Remove the existing seat upholstery from the wheelchair.
Refer to
REPLACING SEAT UPHOLSTERY in PRO-
CEDURE 5 of the Owners Manual, part number 1080737.
NOTE: If adjusting seat depth of the wheelchair, the seat
upholstery MUST be changed as well.
2. Remove the two (2) plug buttons from the ends of the
crossbraces that are towards front of wheelchair.
NOTE: The two (2) plug buttons will be used in the ends of
the seat extensions.
3. Install the two (2) seat extension tubes into the ends
on the crossbraces. Line up the second mounting
hole from the rear of the seat extension tube with the
front mounting hole in the crossbrace.
4. Install the new seat upholstery onto the wheelchair.
Refer to
REPLACING SEAT UPHOLSTERY in
PROCEDURE 5 of the Owners Manual, part
number 1080737.
NOTE: Make sure to line up the mounting holes in the
seat extension tubes with the new seat upholstery.
5. Install plug buttons into the ends of the seat extension
tubes.
This Procedure Includes the Following:
Adjusting Seat Depth
Adjusting Back Height /Replacing Back Canes
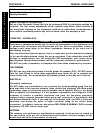
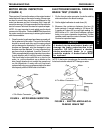
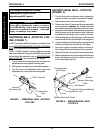
ADJUSTING BACK HEIGHT/
REPLACING BACK CANES
(FIGURE 2)
1. Remove the four (4) hex screws, washers and
locknuts that secure the two (2) back canes to the
wheelchair frame.
2. Reposition the back canes to one (1) of five (5) pairs
of height adjustment holes:
ORIGINAL BACK HEIGHT (IN INCHES)
✪✪
✪✪
✪ HOLE PAIR # 1 2 3 4 5
16-20-inches 16 17 18 19 20
✪ ✪
✪ ✪
✪ Holes numbered from bottom to top for reference only.
(There are no numbers on the back canes.)
3. Reinstall the four (4) hex screws, washers and locknuts
that secure the back canes to the wheelchair frame.
4. Securely tighten the hex screws and locknuts.
WARNING
After ANY adjustments, repair or service
and BEFORE use, make sure that all
attaching hardware is tightened securely
- otherwise injury or damage may result.
Locknuts
Hex Screws
Wheelchair Frame
Back Cane
HOLE PAIR
#
5
4
3
2
1
FIGURE 2 - ADJUSTING BACK HEIGHT/
REPLACING BACK CANES
SEAT FRAME PROCEDURE 4
S
E
A
T
F
R
A
M
E
Washers