


52
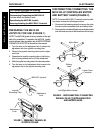
NOTE: An audible click will be heard when the anti-tip-
pers are locked in place.
2. Pull on the anti-tippers to make sure they are locked
securely in place before using the wheelchair.
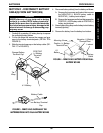
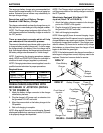
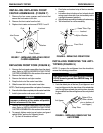
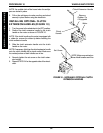
INSTALLING OPTIONAL CLUTCH
EXTENSION HANDLES (FIGURE 10)
1. Turn the power to the wheelchair to the OFF position.
2. Position the clutch extension handle by the clutch
handle on the motor as shown in FIGURE 10.
NOTE: If the clutch handle on the motor is equipped with
a rubber tip, remove the rubber tip before installing the
clutch extension handle.
3. Slide the clutch extension handle onto the clutch
handle on the motor.
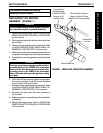
NOTE: If necessary, lightly tap the clutch extension handle
onto the clutch handle with a plastic mallet. Make sure
the vertical portions of both handles are in line.
4. Securely tighten the set screw on the clutch exten-
sion handle.
5. Repeat STEPS 2-4 for the opposite side of the wheel-
chair.
Clutch Extension Handle
Clutch
Handle
Motor
Remove
Rubber Tip
if Equipped
NOTE: Make sure vertical por-
tions of both handles are in line.
Set Screw
FIGURE 10 - INSTALLING OPTIONAL CLUTCH
EXTENSION HANDLES
PROCEDURE 10 WHEELS/ANTI-TIPPER
W
H
E
E
L
S
/
A
N
T
I
-
T
I
P
P
E
R