


Solara™ 68 Part No. 1080556 Rev. I
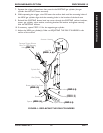
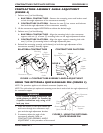
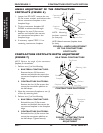
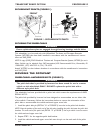
ANGLE ADJUSTMENT OF THE CONTRACTURE
FOOTPLATE (FIGURE 6)
1. Loosen, but DO NOT, remove the two
(2) flat screws, washers and locknuts that
secure contracture footplate to the
footplate hinge.
2. Tilt the contracture footplate UP/
DOWN to achieve desired angle.
3. Retighten the two (2) flat screws,
washers and locknuts that secures
the contracture foot plate to the
footplate hinge.
4. If necessary, repeat STEPS 1-3 on
remaining contracture footplate.
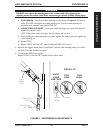
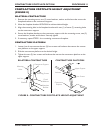
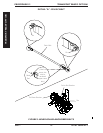
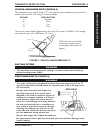
CONTRACTURE FOOTPLATE DEPTH ADJUSTMENT
(FIGURE 7)
NOTE: Observe the angle of the contracture
footplate for reinstallation.
1. Perform one (1) of the following:
A. BILATERAL CONTRACTURE -
Remove the two (2) flat screws,
washers and locknuts that secure the
contracture footplate to the footplate
hinge.
B. CONTRACTURE PLATFORM -
Remove the four (4) flat screws that
secure the contracture platform to
the half clamps.
2. Move the contracture footplate to one (1)
of four (4) mounting hole.
3. Perform one (1) of the following:
A. BILATERAL CONTRACTURE -
Reinstall the two (2) flat screws,
washers and locknuts that secure the
contracture footplate to the footplate
hinge.
B. CONTRACTURE PLATFORM -
Reinstall the four (4) flat screws that
secure the contracture platform to
the half clamps. Tighten securely.
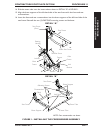
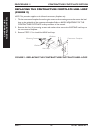
CONTRACTURE
FOOTPLATE OPTION
FIGURE 7 - CONTRACTURE
FOOTPLATE DEPTH
ADJUSTMENT
Contracture
Footplate
Flat Screws
Washers
Footplate Hinge
Lock Nuts
Mounting Hole
BILATERAL CONTRACTURE
CONTRACTURE PLATFORM
Flat Screws
Contracture
Platform
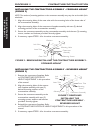
FIGURE 6 - ANGLE ADJUSTMENT
OF THE CONTRACTURE
FOOTPLATE
Contracture
Footplate
Flat Screws
NOTE: Mounting
hardware removed
for clarity only.
Washers
Footplate
Hinge
Lock Nuts
Contracture
Assembly
NOTE: Bilateral contracture footplate shown
for clarity.
CONTRACTURE FOOTPLATE
OPTION
CONTRACTURE FOOTPLATE OPTION
PROCEDURE 11