


42
3. Move the axle bushing in or out to the desired posi-
tion.
4. Securely tighten the jam nuts that secure the axle
bushing to the axle mounting plate.
5. Reinstall the rear wheel onto the wheelchair. Re-
fer to REMOVING/INSTALLING REAR WHEELS
in this procedure of the manual.
6. Repeat STEPS 1-5 for the opposite side of the
wheelchair.
NOTE: Make sure the number of threads showing
beyond the outside jam nut is the SAME for both rear
wheels. This will help avoid a "3-wheeling" situation.
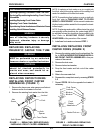
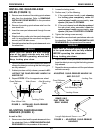
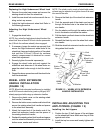
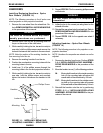
Jam Nuts
Axle Bushing
FIGURE 6 - ADJUSTING WHEELBASE WIDTH
ADJUSTING REAR WHEEL
CAMBER (FIGURE 7)
WARNING
The following procedure should be per-
formed only by an authorized Invacare
Dealer or Qualified Technician.
CAUTION
DO NOT overtighten hex screws that se-
cure the axle mounting plates to the
wheelchair frame. Damage to the wheel-
chair frame can occur.
NOTE: The maximum degree of camber the wheel-
chair will allow is 9
o
. Using more than five (5) total cam-
ber washers will directly affect the performance of the
wheelchair.
1. Remove the rear wheel from the wheelchair. Re-
fer to REMOVING/INSTALLING REAR WHEELS
in this procedure of the manual.
2. Loosen, but do not remove the two (2) TOP hex
screws that secure the axle mounting plate to the
wheelchair.
3. Remove the BOTTOM hex screw, locknut, two (2)
washers, two (2) coved washers and camber wash-
ers that secure the axle mounting plate to the wheel-
chair frame.
NOTE: Observe the attaching hardware for reinstallation,
or refer to FIGURE 7.
4. Install or remove the number of camber washers to
achieve the desired camber angle:
CAMBER ANGLE: 3
o
6
o
7.5
o
9.0
o
NUMBER OF
CAMBER WASHERS: 2345
5. Reinstall the BOTTOM hex screw, locknut, two (2)
washers, two (2) coved washers and camber wash-
ers that secure the axle mounting plate to the wheel-
chair frame. Tighten securely.
6. Securely tighten the two (2) TOP hex screws that
secure the axle mounting plate to the wheelchair frame.
7. Reinstall the rear wheel onto the wheelchair. Refer to
REMOVING/INSTALLING REAR WHEELS in this
procedure of the manual.
8. Repeat STEPS 1-7 for the opposite side of the wheel-
chair.
NOTE: Make sure the number of camber washers is the
same for both rear wheels. This will help avoid a "3-wheel-
ing" situation.
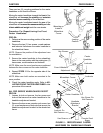
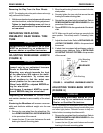
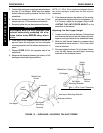
FIGURE 7 - ADJUSTING REAR WHEEL
CAMBER
Bottom
Hex
Screw
One (1)
Washer
Three (3) Camber
Washers (6
o
Camber)
PROCEDURE 6 REAR WHEELS
R
E
A
R
W
H
E
E
L
S
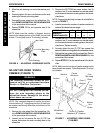
Axle Mounting
Plate
Top
Hex
Screw
Axle
Mounting
Plate
Coved
Washers
Washer
Locknut
Wheelchair
Frame