


16
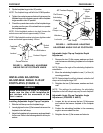
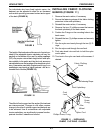
Hex Screw/Coved Washer
Phillips Screw
Spacer
Locknut
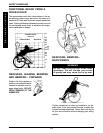
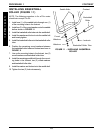
FIGURE 8 - REPLACING HEEL LOOPS
Impact
Guards
Calf Strap
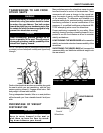
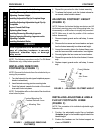
FIGURE 7 - IMPACT GUARDS/OPTIONAL
CALF STRAP
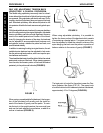
Footrest Support
FRONT VIEW OF
FOOTPLATE AND
FOOTREST SUPPORT.
Footplate
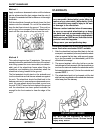
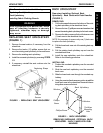
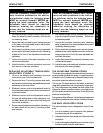
Adjustable Angle Flip-up Footplate
Perpendicular and/or Inversion/Eversion
Adjustment (FIGURES 4 AND 6)
NOTE: It is not necessary to remove the footplate to
perform this adjustment.
1. Insert a flathead screwdriver through the half clamp
on the articulating footplate.
2. Slowly turn the nylon adjustment screw in or out
until the articulating footplate is perpendicular to
the footrest assembly or the desired inversion or
eversion is obtained.
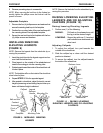
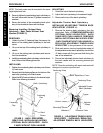
IMPACT GUARDS/CALF STRAP
(FIGURE 7)
NOTE: The following procedure is for all Pro Series
Wheelchairs.
1. Remove impact guard/calf strap from packaged
container if not already secured to the footrest.
2. Secure the impact guards to the footrest frame as
shown in FIGURE 7.
3. Secure the optional calf strap around the footrest
frame (with the impact guards attached).
COMPOSITE FOOTPLATES
Phillips Screw
Phillips Screw
Washer
Washer
ADJUSTABLE FOOTPLATES
FIGURE 6 - ADJUSTABLE ANGLE FLIP-UP
FOOTPLATE PERPENDICULAR AND/OR
INVERSION/EVERSION ADJUSTMENT
Footplate
Footrest Support
SIDE VIEW
OF
FOOTPLATE
AND
FOOTREST
SUPPORT.
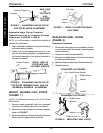
FIGURE 5 - ADJUSTABLE ANGLE FLIP-UP
FOOTPLATE ANGLE ADJUSTMENT
FOOTRESTPROCEDURE 1
F
O
O
T
R
E
S
T
REPLACING HEEL LOOPS
(FIGURE 8)
Composite Footplates
1. Remove the hex screw and coved washer that se-
cures the lower half of the footrest to the swingaway
footrest assembly.
2. Remove the lower footrest assembly.
3. Remove the phillips screw and locknut that secure
the heel loop to the footrest.
4. Slide heel loop over slide tube of footrest assembly.
5. Replace heel loop.