


Instruction Manual
IM-106-880C, OI
September 2009
2-17
Hazardous Area OCX 8800
Reference Air Set, Solenoids, and Blowback Option with
COe Zero Function
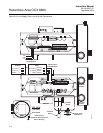
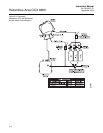
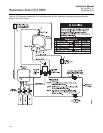
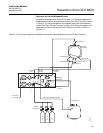
Figure 2-13 shows the piping arrangement for the Hazardous Area OCX 8800
with the blowback and autocalibration options when the COe Zero Function is
used. The arrangement is similar to Figure 2-12 except instrument air is used
as the Hi O
2
test gas. Refer to Sectio 3 for details of the function.
Reference Air Set, Solenoids, and Blowback Option without
COe Zero Function
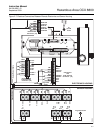
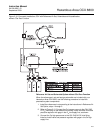
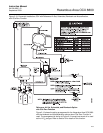
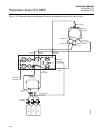
Installing a Hazardous Area OCX 8800 with the blowback option requires the
addition of air operated blowback valve, regulator and gage, and check valve.
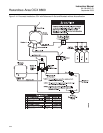
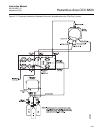
Figure 2-12 shows the piping arrangement for the Hazardous Area OCX 8800
with the blowback and autocalibration options. Figure 2-14 shows the piping
arrangement for the OCX 8800 with the blowback option, but without
autocalibration (without test gas solenoids).
When the reference air set, calibration gas solenoids, and blowback options
are included with your transmitter, use the following procedure to install the
pneumatic system components.
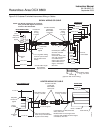
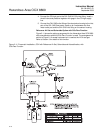
1. Connect the calibration gas sources according to the instructions in the
previous paragraph “Reference Air Set and Solenoids Option”, steps 2
through 5.
2. Connect a clean, dry, instrument-quality supply of air (20.95% O
2
) to the
45 psig and 55 psig pressure regulators. The inlet to the 45 psig
regulator accepts a 1/8" NPT fitting. The inlet to the 55 psig regulator
accepts a 1/4" NPT fitting.
3. See the upper leg of the instrument air supply. Connect the output of the
35 psi regulator/filter to one port of the normally-closed air-operated
solenoid valve, and to the inlet side of the dilution air flow meter.
4. Connect the dilution air flow meter output to the DILUTION AIR inlet
fitting on the sensor housing.
5. Install an instrument air line between the open port of the normally-open
air-operated solenoid valve and the tee fitting on the sensor housing.
6. Connect the output of the 55 psi regulator/filter to one port of the
normally-open air-operated solenoid valve, and to the instrument air
inlet on the back of the electronics housing.
7. Install an air line between the open port of the normally-closed
air-operated solenoid valve and the check valve inlet fitting on the
sensor housing.
8. Install an air line between the instrument air outlet fitting on the
electronics housing and the control air inlet fitting on the air-operated
solenoid valve.