


91
Kirby Morgan 37 & 57
© Copyright 1970-2008 Kirby Morgan Dive Systems, Inc. All rights reserved. Document # 080508001
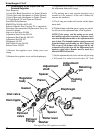
7.7.10 Tuning the SuperFlow 350 Regulator
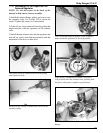
1) Remove the clamp, cover and diaphragm.
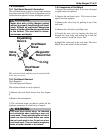
2) Screw the adjustment knob (clockwise) all the way
in, towards the regulator body.
3) Pressurize the regulator to between 120-150 p.s.i.g.
of supply pressure.
4) Screw the adjustment knob out (counterclockwise)
until the regulator starts to free flow, then screw the
adjustment knob in (clockwise) until the free-flow
just stops. Depress the lever several times to ensure
the free-flow has stopped.
If the free flow does not stop, the adjustment nut is
too tight. If the roller lever is sloppy (loose) the ad-
justment nut is too loose.
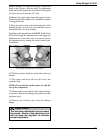
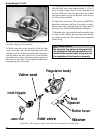
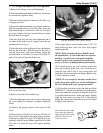
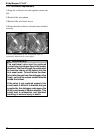
5) Insert the inlet valve holding tool into the balance
hole on the inlet tube. Push forward on the tool to
stop the inlet valve stem from turning. Adjust the
nut until there is 1/16 inch (1.5 mm) to 1/8 inch (3.0
mm) of free play at the end of the lever.
Insert the inlet valve holding tool into the balance
hole on the inlet tube.
6) Remove the inlet valve holder tool.
7) Put the diaphragm and cover in place, depressing
the cover tightly to simulate a properly tightened
clamp.
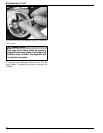
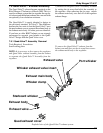
8) Depress the purge button in the center of the
cover.
9) There must be 1/16 inch (1.5 mm) to 1/8 inch (3.0
mm) of free travel before the purge button actuates,
resulting in a slight flow of gas. If a slight flow of gas
develops with the purge button depressed less than
1/16 inch (1.5 mm) the lever will require bending
down.
If the purge button travels further than a 1/8” (3.0
mm) before gas flow starts, the lever will require
bending upward.
NOTE: Before bending the lever, double-check
the adjustments. It is rare that the lever requires
bending. Usually levers only require bending
because of they were improperly serviced previ-
ously, or because of damage during disassembly.
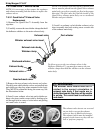
10) To bend the lever up, you’ll need to remove the
lever and carefully place it in a vice. Grip the lever
from the side with a pair of long nosed pliers and
bend the roller end up with your finger. Bend it only
a small amount at a time.
NOTE: Be very careful to not place undue stress
on the lower arms of the lever as this will disfigure
the lower blades and cause spongy operation.
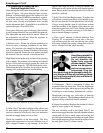
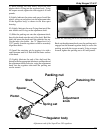
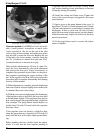
11) To bend the lever down, place the disk end of the
KMDSI 1/4 ” wrench onto the flat area of the adjust-
ment tube within the regulator, sliding the disk as far
as possible under the lever. With your finger, slightly
bend the lever down over the disk to the desired
height. Be careful not to bend the lever too far! Bend
it slightly then check it.
Test the response of the purge button.
Note that the legs of the
lever must be properly
aligned and in the same
plane for the lever to
work correctly.