


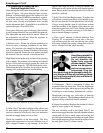

86
© Copyright 1970-2008 Kirby Morgan Dive Systems, Inc. All rights reserved. Document # 080508001
Kirby Morgan 37 & 57
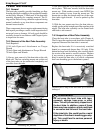
7.7.8 Inspection of SuperFlow 350
Demand Regulator Parts
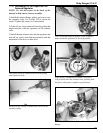
After the regulator has been disassembled, clean and
inspect all parts. Any parts showing signs of wear,
damage or deterioration should be replaced. If this
is an annual overhaul KMDSI recommends replace-
ment of the inlet valve seat, adjustment nut, O-ring
on inlet valve, O-ring on adjustment shaft, washer
on the adjustment shaft. A rebuild kit is available for
replacement parts (Part #525-309).
If any parts show any signs of damage, deterioration
or any damaged threads, the part should be replaced.
The adjustment nut must never be reused. Reuse of
the adjustment nut will not allow the regulator to
maintain proper adjustment.
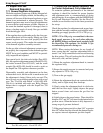
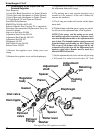
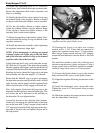
1) Exhaust valve: Ensure the silicone exhaust valve
shows no signs of damage, brittleness or any defor-
mities. The exhaust valve should lay flat against the
seat. If conducting an Annual Overhaul, the exhaust
should be replaced. Ensure the seat spokes that hold
the exhaust valve are smooth, even and not bent.
Slight bends in the spokes may be removed by pressing
with a thumb. The exhaust valve seating area should
be free of dirt and corrosion to ensure the valve can
lay flat and seal properly. NEVER lubricate the valve.
Lubricating the valve can allow dirt to stick to the seat
causing poor performance and wet breathing.
The exhaust valve must be in good condition.
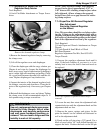
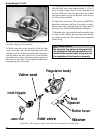
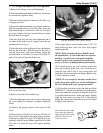
2 ) Inlet valve: Check the condition of the rubber seat
for wear and/or deep grooves. If the red silicone seat
surface is stained to a dark color, this is an indication
that the air supply being used was dirty,
Check the condition of the inlet nipple. The inlet
nipple knife-edge must be in good condition, free of
nicks, chipped chrome or any damage. If the inlet
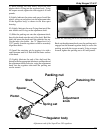
5) Diaphragm: Check to determine if rubber has
separated from the metal disc. Hold the diaphragm
to a bright white light, while aggressively pulling and
stretching to reveal damage, deterioration, or holes.
Diaphragms showing any indication of damage
should be replaced. The diaphragm should always be
replaced during scheduled annual overhauls.
6) Inspect the whisker. Replace the whisker if it shows
signs of wear, aging or any damage.
The new whiskers used in the Quad Valve™ are
much more rugged than the older latex double exhaust
system and will give a much longer service life and
provide better breathing performance at depth. Older
latex double exhaust systems should be replaced with
the new Quad Valve™ exhaust system.
nipple knife-edge has nicks or missing chrome, the
inlet nipple as well as the soft seat will require replace-
ment. During annual overhaul the inlet valve soft seat
should be replaced.
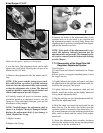
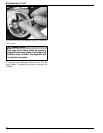
3) Inlet Valve Soft Seat Replacement: To replace the
soft seat use a small screwdriver or O-ring pick to pry
the soft seat from the chrome plated brass valve body.
Using a sewing needle clean all old silicone sealant
from the vent hole in the bottom of the cup area, and
from the cupped area itself. Note: Replace the entire
inlet valve if any chrome is missing or if the shaft is
bent or thread damage is present.
4) Dab a small amount of silicone adhesive Dow
Corning 732 or equivalent on one side of the new
soft seat then press the seat into the cup area of the
inlet valve assembly then using a clean cloth, wipe all
excess silicone from the valve assembly.
also cause long term damage to body tis-
sue. Read and follow all precautions listed
on the silicone sealant tube and Material
Safety Data Sheet.
WARNING
Use silicone sealant in
a well ventilated area.
Do not breathe the
fumes from uncured
silicone sealant. These
fumes are dangerous
and can cause uncon-
sciousness. They can