


83
Kirby Morgan 37 & 57
© Copyright 1970-2008 Kirby Morgan Dive Systems, Inc. All rights reserved. Document # 080508001
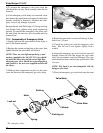
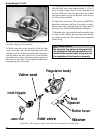
NOTE: Ensure the adjustment shaft (85) rotates
smoothly.
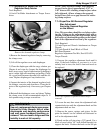
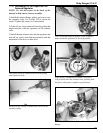
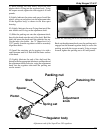
6) Thread the packing nut onto the regulator body
(81) and tighten with the 3/4” torque wrench to 40
inch pounds after seating, turn the knob all the way
in and all the way out making sure there is no inter-
ference.
7.7.6 SuperFlow 350 Demand Regulator
Removal from Helmet
Tools Required:
Torque Wrench and 1 3/8 inch Socket
1 /4 inch Flat Blade Attachment on Torque Screw-
driver
Torque Wrench and 11/16 Open-end Attachment
Torque Wrench and 13/16 Open-end Attachment
Torque Wrench and 7/8 inch Open-end Attachment
7/8 inch Open-end Wrench
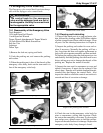
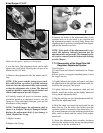
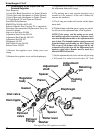
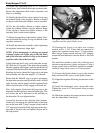
1) To remove the regulator from the helmet, the bent
tube should be disconnected first. The bent tube as-
sembly should be loosened at the side block and dis-
connected from the regulator. It may now be swiveled
out of the way or completely removed.
The regulator mount nut must be removed to
remove the regulator.
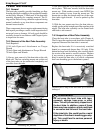
2) Remove the whiskers from the port retainer (108)
by removing the screws. Take care not to lose the
spacers or kidney plates.
3) Remove the nose block device per Chapter 8.
4) Remove the oral nasal mask.
5) The regulator mount nut is removed along with the
sealing O-ring.
6) Cut the tie wrap that connects the regulator body
to the Quad Valve cover.
7) Now the regulator assembly can be pulled out of
the helmet.
8) The center section of the exhaust whisker, named
the exhaust main body has a tie wrap holding it in
place. Remove the tie wrap then stretch the body off
the regulator exhaust flange.
9) Older model double or single exhaust whiskers are
removed similarly.