


33
2. Remove rear shroud and rear storage compartment (if
equipped) from the wheelchair. Refer to
REMOVING/
INSTALLING REAR SHROUD AND REAR STORAGE
COMPARTMENT in this procedure of the manual.
3. Perform one (1) of the following:
A. INTEGRATED SLING SEAT MODELS - Fold the
wheelchair. Refer to
TRANSPORTING RANGER
II MWD - INTEGRATED SLING SEATS in PRO-
CEDURE 12 of this manual.
B. CAPTAIN'S SEAT MODELS - Remove the
Captain's Seat from the wheelchair. Refer to
RE-
MOVING/INSTALLING CAPTAIN'S SEAT in PRO-
CEDURE 5 of this manual.
C. WEIGHT SHIFT BASIC TILT MODELS - Pro-
ceed to STEP 4.
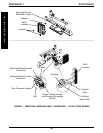
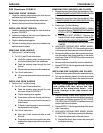
4. Remove the phillips screws and washers that secure
side shroud to wheelchair frame. Refer to FIGURE 1
for phillips screw and washer locations.
5. Remove the phillips bolt and locknut that secure the
side shroud to the wheelchair frame. Refer to FIGURE
1 for phillips bolt and locknut location.
6. Repeat STEPS 4-5 for the opposite side of the wheel-
chair, if necessary.
INSTALLING SIDE SHROUDS.
1. Position the side shroud on the wheelchair frame.
2. Line up the mounting holes in the side shroud with the
mounting holes in the wheelchair frame.
CAUTION
DO NOT overtighten the phillips screws and
phillips bolt that secure the side shroud to
the wheelchair frame - otherwise damage
to the side shroud can occur.
3. Install the phillips bolt and locknut that secure the side
shroud to the wheelchair frame and tighten securely.
DO NOT OVERTIGHTEN. Refer to FIGURE 1 for
phillips bolt and locknut location.
4. Install the phillips screws and washers that secure the
side shroud to the wheelchair frame and tighten se-
curely. DO NOT OVERTIGHTEN. Refer to FIGURE 1
for phillips screw and washer locations.
5. Repeat STEPS 1-4 for the opposite side of the wheel-
chair, if necessary.
6. Perform one (1) of the following:
A. INTEGRATED SLING SEAT MODELS - Unfold
the wheelchair. Refer to
TRANSPORTING
RANGER II MWD - INTEGRATED SLING SEATS
in PROCEDURE 12 of this manual.
B. CAPTAIN'S SEAT MODELS - Reinstall the
Captain's Seat onto the wheelchair. Refer to
RE-
MOVING/INSTALLING CAPTAIN'S SEAT in PRO-
CEDURE 5 of this manual.
This Procedure Includes the Following:
Removing/Installing Shrouds
REMOVING/INSTALLING
SHROUDS
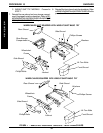
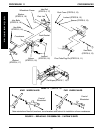
MWD Wheelchairs (FIGURE 1)
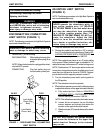
REMOVING FRONT SHROUD.
1. Turn the two (2) 1/4-turn bolts that secure front shroud
to the two (2) side shrouds COUNTERCLOCKWISE.
2. Remove the front shroud from the wheelchair.
INSTALLING FRONT SHROUD.
1. Position the two (2) 1/4-turn bolts with the two (2) mount-
ing holes in the side shrouds.
2. Install the front shroud onto the two (2) side shrouds.
3. Turn the two (2) 1/4-turn bolts that secure the front
shroud to the two (2) side shrouds CLOCKWISE.
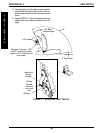
REMOVING REAR SHROUD AND REAR
STORAGE COMPARTMENT.
NOTE: The rear storage compartment is available on
wheelchairs NOT equipped with weight shift basic tilt only.
1. Lift up on rear shroud and remove from wheelchair.
2. Turn the two (2) 1/4-turn bolts that secure the rear stor-
age compartment to the wheelchair frame COUNTER-
CLOCKWISE.
3. Remove rear storage compartment from wheelchair.
INSTALLING REAR SHROUD AND REAR
STORAGE COMPARTMENT.
1. Position the two (2) 1/4-turn bolts with the two (2) mount-
ing holes in the wheelchair frame.
2. Install rear storage compartment onto chair frame.
3. Turn two (2) 1/4-turn bolts that secure the rear storage
compartment to the wheelchair frame CLOCKWISE.
4. Position rear shroud on the two (2) side shrouds and
slide towards the front of the wheelchair until it stops.
5. Press down on the rear shroud until the two (2) clips
secure the rear shroud to the two (2) side shrouds.
REMOVING SIDE SHROUDS.
1. Remove the front shroud from the wheelchair. Refer to
REMOVING/INSTALLING FRONT SHROUD in this
procedure of the manual.
WARNING
After ANY adjustments, repair or service
and BEFORE use, make sure all attaching
hardware is tightened securely - other-
wise injury or damage may result.
PROCEDURE 10SHROUDS
S
H
R
O
U
D
S