


9
MODEL DO-03/04 SECTION 2.0
INSTALLATION
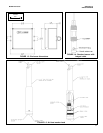
2.2.6 Installing the sensor in the washer head assembly
1. Remove the sensor from its box. Remove the plastic protective cap from the end of the sensor. Save the
cap.
2. Replace the knurled cap provided with the sensor with the smooth cap (PN 33521-01). The smooth cap is
shipped loose.
a. Hold the sensor with the membrane end pointing up.
b. Unscrew the knurled cap. Leave the membrane in place.
c. Screw the smooth cap in place. Hand tighten.
d. Hold the sensor with the membrane end pointing down. Shake the sensor a few times as though shak-
ing down a clinical thermometer.
e. Slide the protective cap back over the end of the sensor.
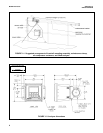
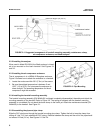
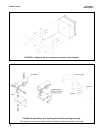
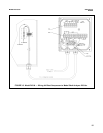
3. Remove the set screw at the bottom of the sensor washer head assembly. See Figure 2-5. Pull the washer
head from the shank. You are pulling against a dual O-ring seal.
4. Press the metal tab on the air hose quick connect fitting and remove the fitting and check valve.
5. Wrap the bottom facing threads of the sensor with pipe tape. Remove the protective cap and slide the O-ring
(PN 9550291) over the end of the sensor until it rests against the lower edge of the bottom facing thread.
The O-ring is in a bag taped to the side of the washer head assembly.
6. Screw the sensor into the bottom of the washer assembly. Hand tighten only. Replace the air hose and
check valve assembly.
2.2.7 Assembling the washer head and pipe boom
1. Cement the upper portion of the washer assembly head to the PVC pipe boom. See Figure 2-5. Use 1-1/2
inch schedule 80 PVC pipe. Press (do not cement) the PVC elbow (PN 9320101) to the top of the pipe
boom. The elbow keeps water from collecting in the pipe boom.
2. Pass the sensor cable and air hose through the boom and elbow.
3. Connect the end of the air hose to the barbed fitting on the check valve.
4. Push the washer head back onto the shank. Use a small amount of grease to lubricate the O-rings. Replace
and tighten the set screw.
2.2.8 Attaching the pipe boom to the handrail mounting assembly
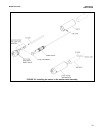
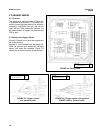
1. Slide the tongue of the pipe clamp into the clevis. Insert the bolt as shown in Figure 2-3.
2. Rest the boom on the maintenance bracket until ready to submerge the sensor in the basin.