


SECTION 9—ANTI-TIPPERS
9000 Jymni™Pediatric Series 52 Part No 1100868
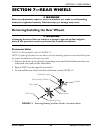
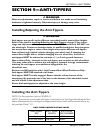
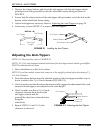
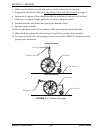
1. Depress the release buttons and insert the anti-tippers with the anti-tipper wheels
pointing toward the ground/floor into the wheelchair frame tubing as shown in
FIGURE 2.
2. Ensure that the release button of the anti-tipper fully protrudes out of the hole in the
bottom of the wheelchair frame tubing.
3. Adjust anti-tippers as necessary. Refer to Adjusting the Anti-Tippers on page 52.
4. If necessary, reverse STEPS 1-2 to remove the anti-tippers
FIGURE 9.1 Installing the Anti-Tippers
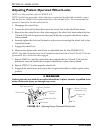
Adjusting the Anti-Tippers
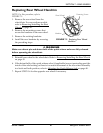
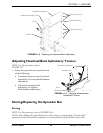
NOTE: For this procedure, refer to FIGURE 9.2.
NOTE: A 1½ to 2-inch clearance between the bottom of the anti-tipper wheels and the ground/floor
MUST be maintained at all times.
1. Place wheelchair on a flat, level surface.
NOTE: On recliner models, ensure back canes are in the upright position before determining 1½
to 2-inch Clearance.
2. Press the release buttons near the wheeled portion of the anti-tipper and slide it up or
down to achieve the 1½ to 2-inch clearance (FIGURE 9.2).
3. Check to make sure that the release buttons are fully engaged in adjustment holes, and
ensure both anti-tippers are adjusted to the same height.
4. Check to make sure that a 1½ to 2-inch
clearance between the bottom of the
anti-tipper wheels and the
ground/floor has been achieved before
using the
wheelchair.
5. Repeat STEPS 1-3 until 1½-2-inch
clearance is achieved.
FIGURE 9.2 Adjusting the Anti-Tippers
Anti-Tipper
Release Buttons
Wheelchair Frame
Anti-Tipper
Length
Anti-Tippers
Top Position
DETAIL “A”
Anti-Tippers
Release Buttons
1½ to 2 Inch
Clearance