


SECTION 10—BATTERIES
Lynx™L-3 & Lynx L-4 40 Part No. 1143205
Installing
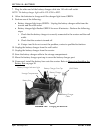
1. Install the two new batteries into the battery box.
2. Secure the thermal switch to the side of the left battery using tape*.
*NOTE: The thermal switch needs to be well secured and in direct contact with the side of the
battery. Service tape is available as a service part and is the recommended solution. As an alternate,
a heavy duty “duct” styled tape can be used. If “duct” styled tape is used, wrapping the tape
completely around the battery with minimal overlap will provide the best adhesion.
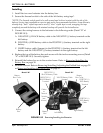
3. Connect the wiring harness to the batteries in the following order (Detail “B” of
FIGURE 10.3):
A. NEGATIVE (-) BLACK battery cable to the NEGATIVE (-) battery terminal on the
left battery.
B. POSITIVE (+) RED battery cable to the POSITIVE (+) battery terminal on the right
battery.
C. WHITE battery cable (Jumper) to the POSITIVE (+) battery terminal on the left
battery and the NEGATIVE (-) battery terminal on the right battery.
4. Replace the top of the battery box and secure with the twelve mounting screws (Detail
“A” of FIGURE 10.3). Securely tighten.
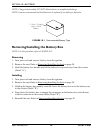
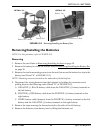
5. Reinstall the battery box on to the scooter frame. Refer to Removing/Installing the
Battery Box on page 38.
6. Reinstall the seat. Refer to Removing/Installing/Adjusting the Padded Seat on page 29
or Removing/Installing the Deluxe Seat on page 31.
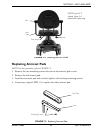
FIGURE 10.3 Removing/Installing the Batteries
Detail “A”
Battery
Box
Battery
Box Cover
Detail “B”
Right Battery
Left Battery
POSITIVE (+)
RED Battery
Cable
POSITIVE (+)
RED Battery
Terminal
NEGATIVE (-)
BLACK Battery
Terminal
WHITE Battery Cable
(Jumper)
NEGATIVE (-)
BLACK Battery Cable
Battery
Box
Battery
Box Cover
Cables
to
Thermal
Switch
(not
shown)