


SECTION 3—SEAT AND BACK
9000 Series 24 Part No. 1076155
9000 XDT and 9000 SL
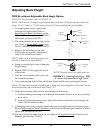
NOTE:Forthisprocedure,refertoFIGURE
3.6.
NOTE:9000XDTwheelchairshavetwo(2)
framedepthranges:16to18inchesand19to
20inches.A16‐18‐inchframedepth
wheelchaircannotbeadjustedtoa19to
20‐inchrangeandvice‐versa.
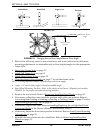
1. Removetheexistingseatupholstery
fromthewheelchair.RefertoReplacing
theSeatUpholsteryintheOwner’s
Manual,partnumber1056953.
NOTE:Whenadjustingtheseatdepthofthe
wheelchair,theseatupholsteryMUSTalsobe
changed.
2. Removethetwo(2)plugbuttonsfrom
theendsofthecrossbracesthatare
towardsthefrontofthewheelchair.
NOTE:Thetwo(2)plugbuttonsareusedin
theendsoftheseatextensiontubes.
3. Installthetwo(2)seatextensiontubes
intotheendsonthecrossbraces.
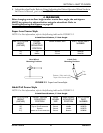
4. Performone(1)ofthefollowing:
• 9000XDT‐Alignthesecond
mountingholefromtherearofthe
seatextensiontubewiththe
frontmostmountingholeinthe
crossbrace.
NOTE:DO
NOTusebackmounting
hole.Ifbackmountingholeisused,the
mountingholefortheothermounting
screwwillnotlineupproperly.
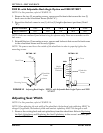
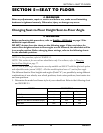
FIGURE 3.6 Adjusting Seat Depth - 9000
XDT and 9000 SL
• 9000SL‐Aligntherearmountingholeoftheseatextensiontubewiththesecond
mountingholefromthefrontofthecrossbrace.Slidespacertubeoverseat
extensiontube.
NOTE:Therearmountingholeisfurtherfromitsendoftheseatextensiontubethanthefront
mountingholeisfromitsend.
NOTE:Theendofthespacertubethatisclosertothespacertubemountingholeshouldface
tothefront.
5. RepeatSTEP4
fortheoppositeseatextensiontube.
Spacer
Tube
Mounting Screws
9000 XDT
Seat Upholstery
Washer
Seat
Extension
Tube
Plug Button
Second
Mounting
Hole
DO NOT use
this back
mounting hole
Crossbrace
9000 SL
Seat Extension
Tube
Mounting Screws
Seat Upholstery
Second
Mounting
Hole
Crossbrace
Rear
Mounting
Hole
Plug Button
Front of
Seat
Rear of
Seat
Rear of
Seat
Front of
Seat
Spacer Tube
Mounting Hole