


SECTION 3—SEAT AND BACK
Part No. 1076155 23 9000 Series
Adjusting Seat Depth
ƽ WARNING
The seat depth, back height/angle, seat angle, size/position of the front casters,
size/position of the rear wheels, anti-tipper model, as well as the user condition
directly relate to the stability of the wheelchair. Any change to one (1) or any com-
bination of the ten (10) may cause the wheelchair to decrease in stability. Use
extreme caution when using a new seating position.
9000XT Model
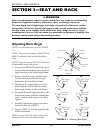
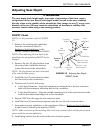
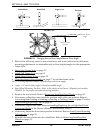
NOTE:Forthisprocedure,refertoFIGURE
3.5.
1. Removetheexistingseatupholstery
fromthecrossbraces.Referto
ReplacingSeatUpholsteryinthe
Owner’sManual,partnumber1056953.
NOTE:Whenadjustingtheseatdepthofthe
wheelchair,theseatupholsteryMUSTalsobe
changed.
2. Removethetwo(2)plugbuttonsfrom
theendsofthecrossbracesthatare
towardthefrontofthewheelchair.
NOTE:Theplugbuttonsareusedintheends
oftheseatextensionspacers.
3. Installthetwo(2)seatextensiontubes
intotheendsonthecrossbraces.
FIGURE 3.5 Adjusting Seat Depth -
9000XT Model
4. Performone(1)ofthefollowing:
•1‐inchSeatExtension‐Alignthefrontmostmountingholeoftheseatextension
tubewiththefrontmostmountingholeinthecrossbrace.
•2‐inchSeatExtension‐Alignthemiddlemountingholeoftheseatextensiontube
withthefrontmostmountingholeinthecrossbrace.
5. RepeatSTEP4fortheoppositeseatextensiontube.
6. Installthetwo(2)seatextensionspacersontothetwo(2)seatextensiontubes.
7. Securethenewseatupholsterytothecrossbraces.RefertoReplacingSeat
Upholstery
intheOwner’sManual,partnumber1056953.
NOTE:Makesuretolineupthemountingholesintheseatextensiontubesandtheseatextension
spacerswiththenewseatupholstery.
8. Installplugbuttonsintotheendsoftheseatextensionspacers.
Mounting
Screws
Seat
Extension
Spacer
Washer
Seat
Upholstery
Crossbrace
Hole for 1-inch
Seat Extension
Seat
Extension
Tube
Plug Button
Hole for 2-inch
Seat Extension
Front of
Seat
Rear of
Seat