M100EU – OPERATIONS MANUAL TELEDYNE INSTRUMENTS
Addendum to M100E Manual - P/N 04145 TROUBLESHOOTING & REPAIR
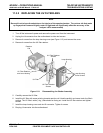
11.3.2 REPLACING THE UV FILTER/LENS
Note:
Be careful not to leave thumbprints on the interior of the sample chamber. The various oils that make
up fingerprints fluoresce brightly under UV light and will significantly affect the accuracy of the
analyzer’s SO
2
measurement)
1. Turn off the instrument’s power and remove the power cord from the instrument.
2. Unplug the J4 connector from the motherboard to allow tool access.
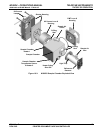
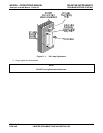
3. Remove 4 screws from the lamp housing cover (see Figure 11-2) and remove the cover .
4. Remove 4 screws from the UV filter retainer.
UV Filter Retainer
Screws
Lamp Housing
UV Filter
Lamp Housing
Cover Screws
UV Filter Retainer
Screws
UV Filter Retainer
and Lens Housing
Reaction
Cell
Figure 11-2: Disassembling the Shutter Assembly
5. Carefully remove the UV filter.
6. Install the UV filter with arrow pointing towards reacti
on cell. Handl
e carefully and never touch the filter’s
surface. The UV filter’s wider ( ring ) side should be facing out. Install the UV filter retainer and tighten
screws.
7. Install the lamp housing cover and mini-fit connector. Tighten 4 screws.
8. Re-plug J4 connector into the motherboard.
05944 Rev B 33
DCN 5063 PRINTED DOCUMENTS ARE UNCONTROLLED


