


SECTION 12—ELECTRONICS
Part No 1125085 73 Pronto® M51™and M61™with SureStep®
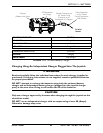
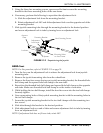
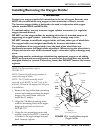
5. Usingthethreehexmountingscrews,spacersandlocknutssecurethemounting
brackettothethreemountingholesofthearmframe.
6. Ifnecessary,performthefollowingtorepositiontheadjustmentlock:
A. Slidetheadjustmentlockfromthemountingbracket.
B. Rotateadjustmentlock180°andslideadjustmentlockovertheoppositeendofthe
mountingbracket.
7. Slidejoystickmountingtubethroughthemountingbrackettothedesiredposition
andsecureadjustmentlocktotubebyturningleveronadjustmentlock.
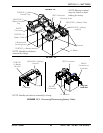
FIGURE 12.2 Repositioning the Joystick
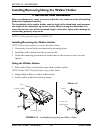
ASBA Seat
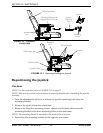
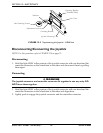
NOTE:Forthisprocedure,refertoFIGURE 12.3onpage 74.
1. Turntheleverontheadjustmentlocktoreleasetheadjustmentlockfromjoystick
mountingtube.
2. Removethejoystickmountingtubefromthewheelchair.
3. Removethethreehexscrewsthatsecurejoystickmountingbracket,thethreadedhole
halfclampandtheopenedhole
halfclamptothearmtube.
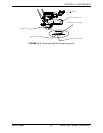
4. Repositionthethreadedholehalfclampandopenedholehalfclampontheopposite
armtube.Makesurethreadedholehalfclampisontheinsideofarmtube.
5. Whileholdingthetwohalfclamps,installthefronthexscrewintothetwohalfclamps.
Securelytighten.
6. Lineupmountingholesofthejoystickmountingbracketwiththemountingholesin
thetwohalfclamps.
7. Securethejoystickmountingbrackettothetwohalfclampswiththeremainingtwo
hexscrews.
8. Slidetubethroughthebrackettothedesiredposition.
9. Slideadjustmentlockoverendoftubeandsecureadjustmentlocktotubebyturning
leveronadjustmentlock.
NOTE:Ifadjustmentlockdoesnotfitovertube,rotate180°.
Hex Mounting Screws
Locknuts
Adjustment
Lock Lever
Mounting Bracket
Armrest
Plate
Spacers
Mounting Holes
on Arm Frame