


36
Instruction manual V 1.4 – 02/2007
6.1 Assembly for fixture for specimen clamps
Depending upon the purchase order, the basic instrument is delivered with the directional or
rigid fixture for specimen clamps which must be assembled first. All specimen clamps
available as accessories can be used in both fixtures for specimen clamps.
Before assembling the fixture for specimen clamps, activate the mechanical handwheel lock!
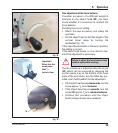
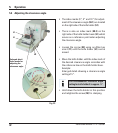
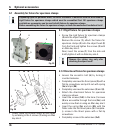
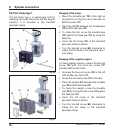
6.1.1 Rigid fixture for specimen clamps
• Screw the rigid fixture for specimen clamps
(4) onto the object head (3):
Remove the screw (1), attach the fixture for
specimen clamps (4) onto the object head (3)
from the front and tighten the screws (2) with
an Allen key size 3.
Next, insert the screw (1) from the side and
briefly tighten it with an Allen key size 4.
Remove the rubber ring only after
attaching the object head!
Fig. 24
1
2
4
5
3
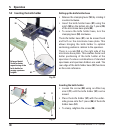
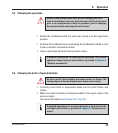
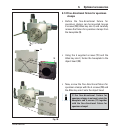
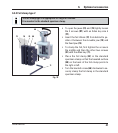
6.1.2 Directional fixture for specimen clamps
• Loosen the eccentric bolt (6) by turning it
counterclockwise.
• Completely unscrew the thrust piece (5) with a
flat-tip screwdriver and pull it out with spring
(5a) and pin (5b).
• Completely unscrew the setscrews (3) and (4).
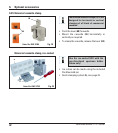
• Attach the directional fixture for specimen
clamps as shown.
• Insert the screws (7+8) in the bore (2 screws
(8) are accessible through the bore (9a)) and
evenly screw them in using an Allen key
size 3.
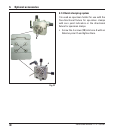
• Insert the spring (5a) and pin (5b) with the
flatter side into the thrust piece (5). Complete-
ly screw in the thrust piece with a flat-tip
screwdriver.
• Completely screw in the setscrews (3+4).
Fig. 25
1
2
35b5a5 6
4
7 + 8
7 + 8 9b 9b
9a 9a
10
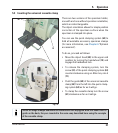
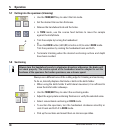
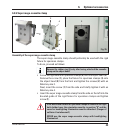
• Finally, place the dovetail holder (2) and fasten
by screwing in the 4 screws (1) using an Allen
key size 3.
6. Optional accessories