23
b) Procedure. Remove load from the hook. To
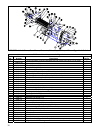
disconnect the geared limit switch refer to
Figure 7-2. Remove the limit switch cover
then loosen the two (2) screws holding the
locking plate in place. Allow the locking
plate to slide down and disengage from the
adjustment discs. Do not rotate the
adjustment discs.
CAUTION
Damage to the hoist may occur if the
block operated limit switch fails during
testing.
Damage can be avoided by immediately
releasing the pushbutton once the lower
block has traveled through the limit
switch weight.
The block operated limit switch may now be
tested by slowly and carefully raising the
hook until the limit switch weight contacts
the lower block. If the hook does not stop
when the limit switch weight is lifted,
immediately release the pushbutton before
damage to your hoist occurs. If the block
operated switch functions properly, proceed
by testing in the same manner with rated
load on the hook.
Once it has been determined that the block
operated limit switch is functioning properly,
the geared limit switch must be
reconnected and tested.
Position the lower block three inches (3”)
below the point where the block operated
limit switch is activated. The geared limit
switch shall be reconnected by sliding the
locking plate back into position ensuring
slots on adjustment discs are fully engaged
and tightening locking plate screws to 4 in-
lbs. (See Figure 7-2). The geared limit
switch must then be tested.
Test the geared limit switch by raising the
lower block until it stops. Ensure that the
geared limit switch stopped the hoist before
the block operated limit switch was
activated. If this is not the case see Section
VII, Paragraph 7-3 for adjusting the geared
limit switch. Replace geared limit switch
cover when testing and adjusting is
complete.
WARNING
Check limit switch operation carefully,
without load, before placing hoist in
service. If misadjusted, SEVERE
DAMAGE AND/OR A DROPPED LOAD
COULD RESULT. Allow 3” for hook drift
in both directions. Never allow less than
two (2) complete wraps of rope on drum
with hook in lowest position.
5-13. TESTING HOIST.
a) General.
Testing shall be performed in
accordance with ANSI B30.16-2 and this
manual. Before placing hoist in service,
hoist should be tested to insure safe
operation when hoist has been
disassembled and reassembled. To test,
suspend hoist from an overhead supporting
member of sufficient strength to support the
weight of the hoist and the rated load.
Connect hoist to power supply as shown on
hoist nameplate and perform the checks
listed in b) and c) below.
b) Check hoist as outlined in PRE-
OPERATION CHECKS, SECTION II,
Paragraph 2-4.
c) Check hoist with rated load.
(1) Attach rated load to lower hook.
(2) Depress “UP” push button and raise
load. When push button is released,
hoist should stop immediately and hold
load at that level.
(3) Depress “DOWN” push button, lower
load a short distance and release
button. Hoist should stop immediately
and hold load at that level.
NOTE:
If load drifts downward slowly in step 2 or 3 above,
motor brake requires adjustment – see Motor Brake
Adjustment – SECTION VII, Paragraph 7-1.


