


17
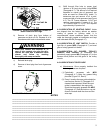
CAUTION
It is imperative that rope reel or coil
rotates as rope unwinds. If coil or reel
does not rotate the wire will be twisted
as it is uncoiled and kinking will result.
A kinked rope may be damaged and
unsafe for maximum service.
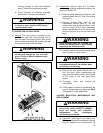
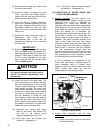
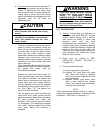
b) Before removing the old rope, refer to
reeving diagram, Figure 5-6. To assist with
re-reeving your hoist, refer to the reeving
diagram and corresponding paragraph that
describes the reeving procedure.
c) Removing old rope
. Please, refer to the
Section IX Parts lists to assist in locating
components referred to in the following
paragraphs.
(1) Lower the lower block to a scaffold 6 to 7
feet below hoist to relieve tension on wire
rope. (Lower block may be lowered to the
floor if desired; however, to handle less
weight and for ease of reeving, adequate
scaffold below the hoist is
recommended.)
FIGURE 5-6. Reeving Diagram – 4 Part
Single-Reeved. (Note: Arrow on Drum
Indicates Direction of Drum when
Lowering.)
CAUTION
Be certain all personnel are clear of
hoist as components, hardware, and
wire rope are removed from hoist.
(2) Remove block operated limit switch
weight from rope.
(3) Remove retaining rings from lower block
sheave pin.
(4) Remove outer lower block sheave
covers.
(5) Remove lower block sheaves and wire
rope.
(6) Remove two (2) rope retention bolts and
nuts from upper block yoke.
(7) Remove two (2) bolts and key plate to
allow removal of upper block sheave pin.
(8) Securely grasp the upper block sheave
before carefully sliding the sheave pin
out. Note that two spacers will also be
released as the pin is removed.
(9) Remove wire rope from sheave.
(10) Remove retaining rings or cotter pins
from dead end anchor pin. Securely
grasp the swaged wire rope and, in some
cases, spacers before removing the pin.
(11) Remove Rope Guide.
(12) Make certain all personnel are clear of
hoist and operate hoist “DOWN” to
completely unwind all wire rope from
drum. Stop hoist so all (3) rope clamps
are accessible. Remove rope clamps and
wire rope from drum.
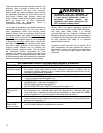
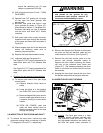
WARNING
Winding rope on rope drums with power
can be hazardous. Keep hands safe
distance from drum; wear gloves and
use extreme care when winding rope.
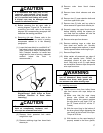
d) Installing new rope.
(1) Thread rope to drum from trolley frame
side then secure with rope clamps as
follows:
(a) Make sure that the rope clamp
groove size utilized as marked
directly above the groove matches
the rope size for your hoist (7/16” on
the “B” Frame and 9/16” on the “C”
Frame).
(b) With the rope lying in the bottom of
the drum groove, begin tightening the
rope clamp at the tail end of the rope.
Torque to 50 ft-lbs.
(c) With tension on the rope keeping it
properly seated in the drum groove,