


34
REPOSITIONING THE AXLE TUBE
(FIGURES 14 AND 15)
NOTE: This procedure should only be performed if changing
the front seat-to-floor height. Refer to
ADJUSTING FRONT
SEAT-TO-FLOOR HEIGHT in PROCEDURE 6 of this manual.
NOTE: Right and left are determined by standing behind the
wheelchair.
1. Remove the rear wheels from the wheelchair. Refer to
REMOVING/INSTALLING REAR WHEELS in this pro-
cedure of the manual.
2. Position the wheelchair on a flat surface with the underside
facing UP.
2. Refer to
ADJUSTING FRONT SEAT-TO-FLOOR
HEIGHT in PROCEDURE 6 of the manual to determine
the proper position for the axle tube.
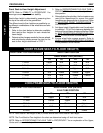
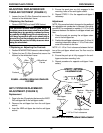
3. Refer to the chart in FIGURE 15 to determine the proper
axle tube adjustment.
NOTE: Refer to DETAIL "B" of FIGURE 15 for telescoping tube
and camber clamp mounting hole patterns.
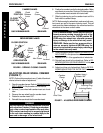
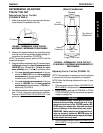
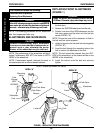
FIGURE 14 - REPOSITIONING THE AXLE TUBE
Long Hex
Screw
Locknuts
Telescoping Tube Mounting Plate
Camber Clamp
Mounting Plate
Camber Clamp
Telescoping
Tube
INSIDE OF
WHEELCHAIR
OUTSIDE OF
WHEELCHAIR
Anti-tip
Tube
Short Hex
Screw
WHEELS
PROCEDURE 7
W
H
E
E
L
S
4. Remove the locknuts and hex bolts securing the
telescoping tube mounting plate to the camber
clamps mounting plate.
5. Perform one (1) of the following:
A. CLAMP POSITION MUST BE REVERSED - Pro-
ceed to STEP 6.
B. CLAMP POSITION REMAINS IN STANDARD
POSITION - proceed to STEP 11.
6. Loosen the hex screw securing the telescoping tube
clamp.
7. Remove the RIGHT telescoping tube wheelchair frame
and set aside.
8. Remove the LEFT telescoping tube from the wheel-
chair frame.
9. Insert the LEFT telescoping tube into the RIGHT side
of the wheelchair frame with the mounting plate to-
wards the INSIDE of the wheelchair.
10. Repeat STEP 9 for the RIGHT telesocping tube and
the LEFT side of the wheelchair frame.
11. Align the camber clamp mounting plate holes with the
telescoping tube mounting plate holes determined in
STEP 5.
12. Install the long hex screw through the telescoping tube
and the camber clamp mounting plate.
13. Install the short hex screw through the telescoping tube
mounting plate and the camber clamp mounting plate.
14. Secure both hex screws with the two (2) locknuts.
15. Install the rear wheels. Refer to
REMOVING/INSTALL-
ING REAR WHEELS in this procedure of the manual.
16. Ensure the caster headtubes are perpendicular to the
ground. Adjust caster height if necessary. Refer to
AD-
JUSTING FRONT CASTER HEIGHT in this proce-
dure of the manual.
17. Adjust anti-tippers. Refer to
ANTI-TIPPER ADJUST-
MENT/REPLACEMENT in PROCEDURE 8 of the
manual.
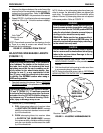
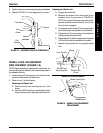
10. Slide the NEW axle tube through the other camber clamp
until the end of the axle tube is flush with the outside of the
camber clamp.
NOTE: DO NOT close the quick release levers or tighten the
hex screws that secure the axle tube to the camber clamps at
this time.
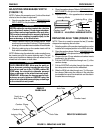
WARNING
NEVER position the camber inserts in the axle tube
with more than 3-inches (12 indexing marks show-
ing) of the camber insert outside of the axle tube.
The camber inserts will not be securely tightened in
the axle tube resulting in possible injury to the user or
damage to the wheelchair.
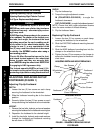
11. Install the rear wheels and camber inserts into the NEW
axle tube and slide the camber inserts to the position
noted in STEP 1. Make sure there is no more than 3-
inches (12 indexing marks) of the camber inserts outside
of the axle tube.
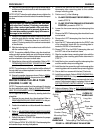
12. Slide the indexing ring on the camber insert until it is flush
with the camber clamp
NOTE: To maximize rollability: Before using the wheelchair,
make sure both camber inserts are set to the same indexing
notch. This will make sure the distance between the rear wheel
and the wheelchair is the same on both sides.
13. Adjust the toe-in/toe-out of the wheelchair. Refer to DE-
TERMINING/ADJUSTING TOE-IN/TOE-OUTin this
procedure of the manual.
NOTE: The performance of the wheelchair will be affected if
the axle tube has not been adjusted to correct the toe in/toe
out of the wheelchair.
14. Ensure the camber clamps are closed. Refer to OPEN-
ING/CLOSING CLAMPS in this procedure of the manual.