


15
B
A
C
K
PROCEDURE 4BACK
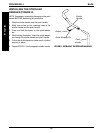
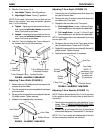
REPLACING THE SPREADER BAR
(FIGURE 6)
NOTE: Make sure the spreader bar is ALWAYS at-
tached to the wheelchair.
1. Remove the back height adjustment screws that
secure the back canes to the back uprights.
2. Remove the cantilever arms, if necessary. Refer
to
INSTALLING/REMOVING CANTILEVER
ARMS in PROCEDURE 5 of this manual.
3. Loosen, but do not remove the two (2) set screws
that secure the EXISTING spreader bar to the back
canes.
4. Slide the EXISTING spreader bar off of the two
(2) back canes.
5. Slide the NEW spreader bar onto the back canes.
6. Securely tighten the two (2) set screws that se-
cure the NEW spreader bar to the back canes.
7. Reinstall the cantilever arms, if necessary. Refer
to
INSTALLING/REMOVING CANTILEVER
ARMS in PROCEDURE 5 of this manual.
8. Align the mounting hole in each back cane with
the desired mounting hole in each back upright.
9. Install the two (2) back height adjustment screws
through the back upright mounting holes deter-
mined in STEP 8 and the back cane mounting
holes.
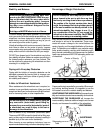
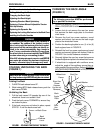
FIGURE 6 - REPLACING THE SPREADER BAR
Spreader
Bar
Set
Screw
Back
Height
Adjustment
Screw
Back Cane
Mounting
Hole
Back
Uprights
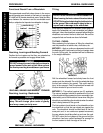
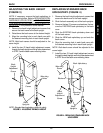
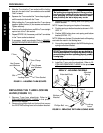
Back Cane
Actuator
Spring
Locking
Mechanism
Long Side of
Locking Mechanism
FIGURE 7 - REPLACING THE LOCKING MECHANISM
IN THE BACK CANE
Angled End of the Locking Mechanism
Mounting
Hole
REPLACING THE LOCKING
MECHANISM IN THE BACK CANE
(FIGURE 7)
WARNING
The locking mechanism is spring loaded. Place
your free hand over the end of the back cane
to prevent the locking mechansim from spring-
ing out of the back cane.
1. Fold the back down. Refer to
FOLDING/UNFOLD-
ING BACK in this procedure of the manual.
2. Unscrew the actuator from the locking mechanism.
3. Remove the locking mechanism and spring from
the back cane.
NOTE: Inspect the spring and replace if necessary.
4. Slide the NEW spring and locking mechanism into
the back cane.
5. Make sure the angled end of the locking mecha-
nism is at the bottom of the back cane.
NOTE: The long side of the locking mechanism should
be toward the actuator opening.
6. Push and hold the locking mechanism into the back
cane.
7. Screw the actuator through the actuator opening
and into the locking mechanism mounting hole.
8. Unfold the back. Refer to
FOLDING/UNFOLDING
BACK in this procedure of the manual.
Actuator Opening