


77
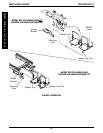
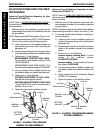
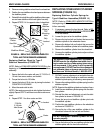
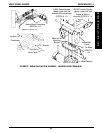
FIGURE 18 - REPLACING STABILIZER WHEEL FOR
TYPE A AND TYPE B STABILIZER ASSEMBLIES
Stabilizer Wheel
Hex Bolt
Locknut
Spacers
Mount
Stabilizer
Wheel in
TOP
Mounting
Hole
Only
Stabilizer
Plates
2. Remove existing stabilizer wheel from the wheelchair.
3. Position the new stabilizer wheel and spacers between
the stabilizer plates.
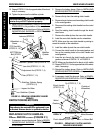
4. Reinstall the hex bolt through the stabilizer plates, spac-
ers and new stabilizer wheel and tighten securely.
5. Repeat STEPS 1-4 for opposite side of wheelchair.
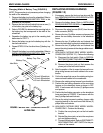
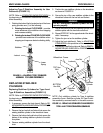
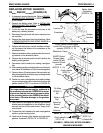
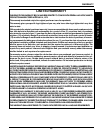
FIGURE 19 - REPLACING STABILIZER WHEEL FOR
TYPE A AND TYPE B STABILIZER ASSEMBLIES
7/16-20x
3-1/4-inch
Hex Screw
Washer
Washer
Locknut
Caster
Replacing Stabilizer Wheel for Type C
Stabilizer Assemblies (FIGURE 19)
NOTE: Refer to STABILIZER INDENTIFICATION in the
beginning of this section to determine correct stabilizer
assembly.
1. Secure the fork to the caster with one (1) 7/16-20 x 3-
1/4-inch hex screw, washer, and locknut.
2. Torque the locknut to 120-in/lbs.
3. Loosen the locknut 1/8 of a turn by turning the locknut
COUNTER-CLOCKWISE.
4. Move the caster side to side.
NOTE: If the caster moves side to side, tighten the locknut
slightly. Repeat STEP 3 until there is no side to side move-
ment.
5. Repeat STEP 1 for other caster and fork.
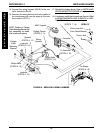
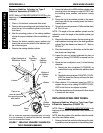
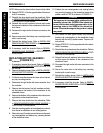
REPLACING STABILIZER CYLINDER
SPRINGS (FIGURE 16)
Replacing Stabilizer Cylinder Springs for
Type A Stabilizer Assemblies (FIGURE 14)
NOTE: Refer to STABILIZER INDENTIFICATION in
the beginning of this section to determine correct sta-
bilizer assembly.
1. If necessary, remove the front shroud. Refer to RE-
MOVING/INSTALLING SHROUDS in PROCEDURE
10 of this manual.
2. Loosen the jam nut on the stabilizer cylinder.
3. Remove the top hex bolt and locknut that secure the
stabilizer cylinder to the wheelchair frame.
4. Remove the bottom bolt and locknut that secure the
bottom of the stabilizer cylinder to the stabilizer plates.
5. Remove the stabilizer cylinder from the wheelchair.
6. Unscrew the stabilizer cylinder pivot and jam nut from
the stabilizer cylinder.
WARNING
The stabilizer cylinder spring is under compression.
SLOWLY remove the adjustment nut while check-
ing to make sure the cylinder spring is becoming
uncompressed. If the spring is not becoming
uncompressed, DO NOT remove the adjustment
nut, otherwise injury or damage can occur. Con-
tact Invacare Technical Service, 1-800-832-4707.
7. SLOWLY remove adjustment nut and plate from sta-
bilizer cylinder while checking to make sure existing
stabilizer cylinder spring is becoming uncompressed.
8. Remove the existing stabilizer cylinder spring from the
stabilizer cylinder.
NOTE: Examine the stabilizer cylinder and replace if worn.
9. Install the new stabilizer cylinder spring onto the stabi-
lizer cylinder.
10. Reinstall the plate and adjustment nut onto the stabi-
lizer cylinder as shown in FIGURE 16.
11. Screw the jamnut and stabilizer cylinder pivot onto
the stabilizer cylinder.
12. Position the new stabilizer cylinder on the wheelchair
as shown in FIGURE 16.
13. Secure the top of the new stabilizer cylinder to the
wheelchair frame with the hex bolt and locknut.
WARNING
DO NOT overtighten. Stabilizer cylinder will not
operate properly.
14. Secure the bottom of the new stabilizer cylinder to the
stabilizer plates with the hex bolt and locknut.
PROCEDURE 14MWD WHEELCHAIRS
M
W
D
W
H
E
E
L
C
H
A
I
R
S