


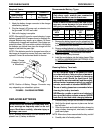
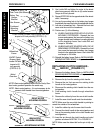

53
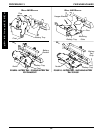
INSTALLING (FIGURE 12).
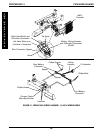
1. Line up mounting holes in the new/existing battery tray
with the mounting holes in the battery tray hanger
bracket.
2. Position one (1) of the washers between the battery
hanger bracket and the new/existing battery tray.
3. Reinstall one (1) of the hex bolts and washers through
the new/existing battery tray, washer and battery tray
hanger bracket and loosely tighten with a locknut.
4. Repeat STEPS 2-3 for the remaining washers, hex
bolt, and locknut.
5. Tighten the two (2) hex bolts and locknuts.
NOTE: Tighten the Two (2) hex bolts and locknuts until
the tray stays up by itself. Over tightening the hex bolts
and locknuts will make the battery tray difficult to flip up.
6. Reinstall the battery boxes. Refer to INSTALLING/RE-
MOVING BATTERY BOXES in this procedure of the
manual.
FIGURE 12 - REMOVING/INSTALLING BATTERY TRAY
FOR R2
BASIC
AND R2
STANDARD
.
Battery Tray Hanger Bracket
Battery Tray
Hex Bolts
Locknuts
Washers
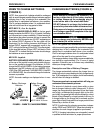
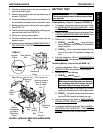
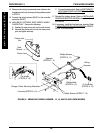
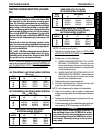
FIGURE 11 - BATTERY TRAY - CHANGING WIDTH OF
BATTERY TRAY
18-inch Wheelchair
20-inch Wheelchair
Battery Tray Pin
Battery Tray
Hex Bolts
Locknuts
16-inch Wheelchair
Battery Tray
Pivot
Changing Width of Battery Tray (FIGURE 11)
NOTE: This procedure applies to
R2
BASIC
AND R2
STANDARD
only.
NOTE: This procedure is only necessary when changing
the width of the wheelchair.
1. Fold the battery tray. Refer to FOLDING BATTERY
TRAY FOR TRANSPORT in this procedure of the
manual.
2. Remove the hex bolt and locknut that secure one (1) of
the battery tray pins to the battery tray.
3. Refer to FIGURE 11 to determine mounting hole in the
battery tray that corresponds to width of the wheelchair.
4. Reposition the battery tray pin to the mounting hole
determined in STEP 3.
5. Secure the battery tray pin to the battery tray with the
hex bolt and locknut.
6. Repeat STEPS 2-5 for remaining battery tray pin and
two battery tray pivots.
Removing/Installing Battery Tray for R2
BASIC
and R2
STANDARD
.
REMOVING (FIGURE 12).
1. Remove the battery boxes from the wheelchair. Refer
to
INSTALLING/REMOVING BATTERY BOXES in this
procedure of the manual.
2. Remove the two (2) hex bolts, four (4) washers and
two (2) locknuts that secure the existing battery tray
and washers to the battery tray hanger bracket.
3. Remove the existing battery tray from the wheelchair.
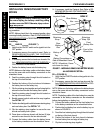
Removing/Installing Battery Tray R2
JR
.
(FIGURE 13)
REMOVING.
1. Remove the battery boxes from the wheelchair. Refer
to
INSTALLING/REMOVING BATTERY BOXES in this
procedure of the manual.
2. Remove the two (2) mounting screws, four (4) wash-
ers, and two (2) locknuts that secure the battery tray
to the battery tray bracket.
3. Remove the battery tray from the wheelchair.
INSTALLING.
1. Position battery tray inside tab of battery tray bracket.
2. Secure battery tray to battery bracket with the exist-
ing two (2) mounting screws, four (4) washers, and
two (2) locknuts. Torque mounting screws to 72-inch
pounds. See Figure 12 for hardware orientation.
F
W
D
W
H
E
E
L
C
H
A
I
R
S
PROCEDURE 13FWD WHEELCHAIRS