


31
2. Apply a thin film of anti-seize compound one (1) inch in
length to the end of the drive shaft.
3. Reinstall drive wheel hub onto the gearbox drive shaft.
NOTE: While installing the drive wheel hub onto the drive
shaft, spin the drive wheel hub to evenly distribute the anti-
seize compound over the entire drive shaft.
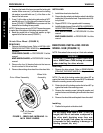
4. Install the washer and NEW locking tab washer onto
the wheel hub. Make sure the locking tab is in line with
the keyway of the wheel hub.
5. Apply Loctite 242 to the mounting screw.
6. Install the mounting screw. Use a torque wrench only
and torque to 90-inch pounds.
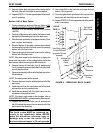
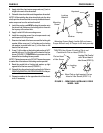
7. Examine the head of the hex screw and the locking tab
washer. Make sure one (1) of the tabs on the locking
tab washer is parallel with one (1) of the flats on the
head of the hex screw.
8. If one (1) of the tabs on the locking tab washer is NOT
parallel with one (1) of the flats on the head of the hex
screw (FIGURE 1), TIGHTEN the hex screw until the
closest flat and locking tab are parallel.
NOTE: Tighten hex screw only. DO NOT loosen hex screw
to make one of the tabs on the locking washer parallel.
9. Bend the parallel tab of locking tab washer up tight
against flat of the hex screw (FIGURE 1).
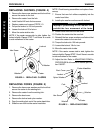
10. Reinstall the drive wheel onto the wheel hub. Refer to
REMOVING/INSTALLING DRIVE WHEELS in this pro-
cedure of the manual.
11. Repeat procedure for the opposite side of the wheel-
chair, if necessary.
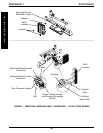
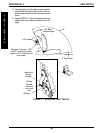
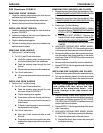
FIGURE 3 - REMOVING/INSTALLING DRIVE
WHEEL HUB
Locking
Washer
Keyway
Mounting Screw (Apply Loctite 242 and use a
Torque Wrench only to Torque to 90-inch pounds)
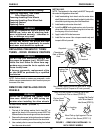
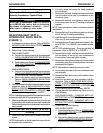
TIGHTEN Hex Screw if Locking Tab is not
Parallel with Flat on Head
(STEP 9)
Flat on Head
of Hex Screw
Locking
Tab
Locking Tab Parallel
with Flat on Head of
Hex Screw
(STEP 9)
Bend Tab up tight against Flat on
Head of Hex Screw
(STEP 10)
Mounting
Screw
Washer
Drive
Shaft
Keystock
W
H
E
E
L
S
PROCEDURE 9WHEELS