


51
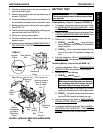
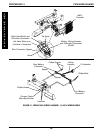
Rear Shroud
Front
Battery
Box
Rear
Battery
Box
Retaining
Strap
Front
Shroud
Battery
Connections
on Side of
Wheelchair
Frame
Slot
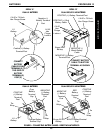
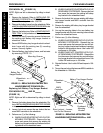
FIGURE 8 - INSTALLING/REMOVING BATTERY BOXES
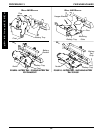
R2
JR
Battery
Tray
DETAIL "A"
Retaining
Strap
Joystick
Cable
Tie-Wrap
Retaining
Strap
Rear Battery
Box
Pull this end of
retaining strap to
secure battery
box in place
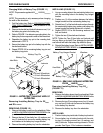
8. Pull end of retaining strap to secure front battery box
and front shroud in place.
9. Position the rear battery box onto the battery tray as
shown in FIGURE 8.
10. Connect the battery cable from the rear battery box to
the rear battery connectors on the wheelchair frame.
11. Bundle excess joystick cable and tie wrap together.
See DETAIL "A".
12. Position excess joystick cable between retaining strap
and rear battery box. See DETAIL "A".
13. Clip the rear retaining strap together.
14. Pull end of retaining strap to secure battery box and
joystick in place.
15. Install the rear shroud. Refer to
REMOVING/INSTALL-
ING SHROUDS in PROCEDURE 9 of this manual.
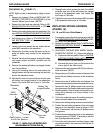
BATTERY TRAY
WARNING
Pinch point exists between battery tray and bat-
tery bracket.
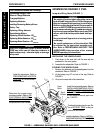
Folding Battery Tray for Transport (FIGURE 9)
1. If necessary, remove the front and rear shroud. Refer
to
REMOVING/INSTALLING SHROUDS - FWD
WHEELCHAIRS in PROCEDURE 9 of this manual.
2. Remove the battery boxes from the wheelchair. Refer
to
INSTALLING/REMOVING BATTERY BOXES in this
procedure of the manual.
3. Perform one (1) of the following:
A. FOR R2
BASIC
and R2
STANDARD
- Lift up on the pin
side of the battery tray and rotate UP towards the
battery tray pivot.
B. FOR R2
JR
- Lift up on the notched side of the bat-
tery tray and rotate UP towards the battery tray
pivot.
4. Fold the wheelchair. Refer to
TRANSPORTING
RANGER II FWD in this procedure of the manual.
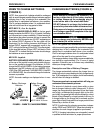
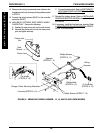
Unfolding Battery Tray for Use (FIGURE 10)
1. Unfold the wheelchair. Refer to
TRANSPORTING
RANGER II FWD in this procedure of the manual.
2. Perform one (1) of the following:
A. FOR R2
BASIC
and R2
STANDARD
-
WARNING
Make sure pins of battery tray are secure in
the mounting slots of the hanger bracket,
otherwise injury or damage may result.
Rotate the pin side of the battery tray DOWN
against the mounting slots on the hanger bracket.
B. FOR R2
JR
- Rotate the notched side of the battery
tray and DOWN against the battery tray stop.
3. Install the battery boxes. Refer to
INSTALLING/RE-
MOVING BATTERY BOXES in this procedure of the
manual.
4. If necessary install the front shroud. Refer to
REMOV-
ING/INSTALLING SHROUDS - FWD WHEEL-
CHAIRS in PROCEDURE 9 of this manual.
F
W
D
W
H
E
E
L
C
H
A
I
R
S
PROCEDURE 13FWD WHEELCHAIRS