


19
STEERING LINK PROCEDURE 6
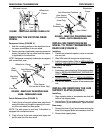
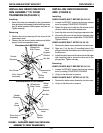
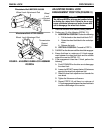
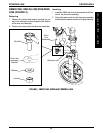
FIGURE 1 - CONNECTING/REMOVING
STEERING LINK TO/FROM FORK
S
T
E
E
R
I
N
G
L
I
N
K
Steering Link
Steering Pin
(REMOVED)
Fork Spring
Straight Section
Fork
Hole
INSTALLING CLD ON EXISTING
WHEELCHAIR
1. Connect the steering link to the fork. Refer to CON-
NECTING/REMOVING THE STEERING LINK TO/
FROM THE FORK in this procedure of the manual.
2. Adjust the caster and drive arm alignment. Refer to
ADJUSTING CASTER AND DRIVE ARM ALIGN-
MENT in this procedure of the manual.
REPLACING THE STEERING LINK
1. Remove the EXISTING steering link from the fork. Refer
to
CONNECTING/REMOVING THE STEERING LINK
TO/FROM THE FORK in this procedure of the manual.
2. Remove the existing steering link from the drive arm
assembly. Refer to
REMOVING/INSTALLING
STEERING LINK in this procedure of the manual.
3. Install the NEW steering link onto the drive arm as-
sembly. Refer to
REMOVING/INSTALLING STEER-
ING LINK in this procedure of the manual.
4. Connect the NEW steering link to the fork. Refer to
CONNECTING/REMOVING THE STEERING LINK
TO/FROM THE FORK in this procedure of the manual.
5. Adjust the caster and drive arm alignment. Refer to
ADJUSTING CASTER AND DRIVE ARM ALIGN-
MENT in this procedure of the manual.
CONNECTING/REMOVING STEERING
LINK TO/FROM FORK (FIGURE 1)
Connecting
1. Compress and hold the straight section of the fork spring
by pushing the spring horizontally towards the fork.
2. Insert the steering pin into the hole in the fork.
NOTE: It may be necessary to rotate the caster to align the
steering pin with the hole in the fork.
3. Release the straight section of the fork spring.
4. Ensure the spring has snapped into the groove on the
steering pin by lifting up on the steering link.
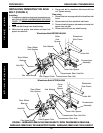
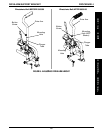
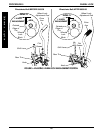
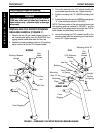
ADJUSTING CASTER AND DRIVE
ARM ALIGNMENT (FIGURE 2)
Aligning the Caster and Drive Arm
NOTE: The wheelchair should be on a flat surface when
examining the drive arm and caster alignment.
1. Position the drive arm so it is perpendicular to the
wheelchair frame.
2. Face the front of the wheelchair and examine the
caster and perform one (1) of the following:
A. CASTER POINTS STRAIGHT AHEAD - No ad-
justment is needed at this time.
B. CASTER POINTS TO INSIDE OF WHEEL-
CHAIR- Steering link should be shortened. Con-
tinue to STEP 3.
C. CASTER POINTS TO OUTSIDE OF WHEEL-
CHAIR - Steering link should be lengthened. Con-
tinue to STEP 3.
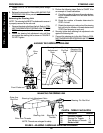
3. Remove the steering link from the fork. Refer to
CON-
NECTING/REMOVING STEERING LINK TO/FROM
FORK in this procedure of the manual.
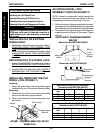
4. Loosen both steering link adjustment nuts.
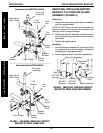
5. Rotate the steering pin rod end to adjust the length
of the steering link.
Turning steering link:
CLOCKWISE - shortens the steering link.
COUNTERCLOCKWISE - lengthens the steering link.
6. Connect the steering link to the fork. Refer to
CON-
NECTING/REMOVING STEERING LINK TO/FROM
FORK in this procedure of the manual.
This procedure includes the following:
Installing CLD on Existing Wheelchair
Replacing the Steering Link
Connecting/Removing Steering Link To/From Fork
Adjusting Caster and Drive Arm Alignment
Removing/Installing Steering Link
WARNING
After ANY adjustments, repair or service and BEFORE
use, make sure all attaching hardware is tightened
securely - otherwise injury or damage may result.
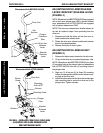
Removing
1. Compress and hold straight section of the fork spring
by pushing spring horizontally towards fork.
2. Pull up on the steering pin to remove from the fork.
NOTE: Tracer wheelchair
shown for clarity.