


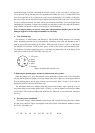


annunciator begin to twinkle, indicating the electric circuitry of the scale body in working state.
The crane scale will go into the power-saving mode and twinkle once every 5 seconds when it has
been out of operation or the weight on the scale has kept unchanged for 30 seconds. At this time,
the scale will go into the normal working condition automatically if the load varies≥0.1%F.S and
0.3%F.S. within one second. The scale will be powered off automatically if the load weight keeps
unchanged for 30 minutes. If need to be restarted, turn the power switch off or take off the battery
plug, and then turn power switch on or insert plug several seconds later,
Note: No keeping battery in scale for a long time without antenna installed, just in case that
damages happen to wireless digital transmitter in scale body.
4. Wire Working Style
No necessary to install battery and antenna to XK3190-H2B during indicator wire working
mode. Weighing operation can be performed after connecting scale body and indicator to the 2
ends of signal cable and turning on the switch. When powered off, press <<Off>> to shut down
the indicator first and then cut off the back power switch or take off the wire transmitting cable.
The indicator will remain supplying power to scale body and shorten the life of the battery if the
back power switch is not off or the cable is not took off.
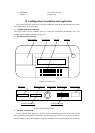
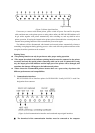
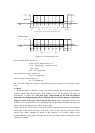
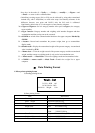
1- 12V power
2- Space
3- Signal
4- Space
5- Earthing
1 5
2 4
3
(Figure 4) Signal cable interface view
5. Replacing the printing paper and the ink ribbon of the micro printer
Open the printer cover, press the pothooks on the both sides of printer rack to take the printer
off, take out the paper reel (paper is used up) and put a new reel of paper in, cut the paper end into
an arch and then push it into the paper feeding slot of the printer, press <<Paper>> to set it into an
appropriate position, and close the printer cover.
The ink ribbon needs to be replaced when the printed letter became vague. Open the cover of
the printer and press the button marked with <<PUSH>> on the ink ribbon, one end of the ribbon
will be tilted. Take out the old ribbon and install the new ribbon in a reverse direction, then close
the cover.
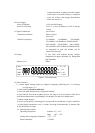
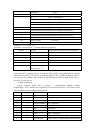
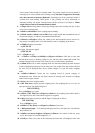
6. External printer installation
The printer interface adopts standard parallel output and 25-pin RS232 plug, the pins of which
are laid out as shown in Figure 4,compatible with stylus printer with character database (such as
KX-P1131, LQ1600K, etc)
ST D0 D1 D2 D3 D4 D5 D6 D7 BUSY