


8
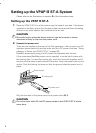
To set up the VPAP III ST-A with the HumidAire:
1. Fill the HumidAire with water as described in the humidifier manual.
2. Place the filled water chamber inside the HumidAire. Connect the medium
(21") air tubing to the right connector port, and the long air tubing (6’6" or
9’10") to the left connector port on the humidifier (G-1). Close the HumidAire
lid.
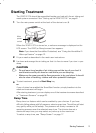
3. Place the VPAP III ST-A on top of the HumidAire (G-2). Do not place the
VPAP III ST-A underneath the humidifier. (This is to avoid water spilling into
the device which may cause severe and costly damage.)
4. Connect the free end of the medium air tubing to the air outlet of the
VPAP III ST-A (G-3).
5. Connect the mask system to the free end of the long air tubing. The final
assembly should look like illustration G-4.
6. Plug the HumidAire power cord into a power outlet.
7. If the VPAP III ST-A is not already plugged in, see Step 2 on page 6.
!
WARNING
Make sure that the power cord and plug are in good condition and the
equipment is not damaged.
8. Navigate to the humidifier setting (if available) in the VPAP III ST-A menu and
select "HUMIDAIRE". See “How to Use the Detailed Menu (if enabled by
your clinician)” on page 18.
The VPAP III ST-A is now ready for use with the HumidAire. To start treatment,
see “Starting Treatment” on page 11.
Attaching a Passover Humidifier
Please refer to the illustrations in section H of the illustration sheet.
Medium size (21") air tubing is a necessary accessory for connecting the VPAP III
ST-A to the ResMed Passover humidifier.
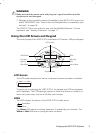
To set up the VPAP III ST-A with the ResMed Passover:
1. Fill the Passover with water as described in the humidifier manual.
2. Connect the medium (21") air tubing to the right connector port, and the long
air tubing (6’6" or 9’10") to the left connector port on the humidifier (H-1).
3. Place the VPAP III ST-A on top of the Passover (H-2). Do not place the
VPAP III ST-A underneath the humidifier. (This is to avoid water spilling into
the device which may cause severe and costly damage.)
4. Connect the free end of the medium air tubing to the air outlet of the
VPAP III ST-A (H-3).
5. Connect the mask system to the free end of the long air tubing. The final
assembly should look like illustration H-4.
6. If the VPAP III ST-A is not already plugged in, see Step 2 on page 6.