


6
Setting up the VPAP III ST-A System
Please refer to the illustrations in section D of the illustration sheet.
Setting up the VPAP III ST-A
1 Place the VPAP III ST-A on a flat surface near the head of your bed. If the device
is placed on the floor, ensure that the area is free from dust and clear of bedding,
clothes or any other objects that could block the air inlet.
!
CAUTION
Be careful not to place the device where it can be bumped or where
someone is likely to trip over the power cord.
2
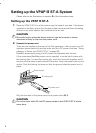
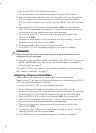
Connect the power cord
There are two sockets at the rear of the flow generator—the top one for an AC
(standard mains electricity) and the lower one for a DC power cord (see “Using
a Battery to Power the VPAP III ST-A” on page 30).
ResMed recommends using the AC power cord supplied with the unit.
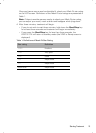
If the customized ResMed power cord is supplied, it can be held in place with
the locking clips. To insert the locking clip, pinch the free ends together and fit
the pins into the holes on both sides of the socket. Insert the power cord into the
socket. Push the locking clip down so that the groove holds the power cord in
place.
Plug the free end of the power cord into a power outlet (D-1).
!
CAUTION
Do not connect both AC and DC power cords to the VPAP III ST-A at the
same time.
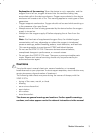
Power switch
AC locking clip
AC power cord