


ENGLISH
• If any visible deterioration of a
component is apparent (cracking,
crazing, tears etc), the component
should be discarded and replaced.
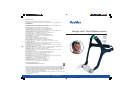
CLEANING THE MIRAGE SWIFT
BETWEEN PATIENTS
The system (excluding the short tube
assembly) is validated for multiple patient
re-use. Clinicians should refer to the Masks
Disinfection/Sterilisation Guide for details.
To clean the headgear between patients
use the method described in the previous
section “Cleaning the Mirage Swift in the
Home”.
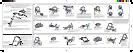
REASSEMBLING THE MIRAGE
SWIFT
See section D on the illustrations sheet.
1 Make sure both seal rings are properly
fitted to the headgear rings (D-1).
2 Assemble the pillow sleeve assembly.
To do this:
a Wrap the pillow sleeve around the
frame. Then insert the pillow sleeve
edges into the groove of the frame
(D-2a).
b Slide the clip onto the frame to
secure the pillow sleeve in place
(D-2b).
Note: If the clip does not slide easily,
check that the pillow sleeve edge is fitted
flush to the groove of the frame.
3 Attach the pillow sleeve assembly to the
headgear. To do this, firmly push the
ends of the frame into the headgear
rings (D-3). When attaching the pillow
sleeve assembly make sure:
• the headgear panels are facing out
• the nasal pillows are pointing
upwards
• the vent faces out–away from the
headgear.
Make sure the pillow sleeve assembly is
properly fitted to the headgear before
going on to the next step.
4 Attach the short tube assembly to your
preferred side of the pillow sleeve
assembly. To do this, push the elbow
into the seal ring until clicks into place
(D-4).
5 Insert the cap into the other seal ring
until it clicks into place (D-5).
6 The assembled system should look like
this (D-6). Make sure the vent faces
out–away from the headgear.
ADDITIONAL INFORMATION
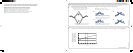
REASSEMBLING THE HEADGEAR
See section E on the illustrations sheet.
If taken apart, the headgear has four parts:
A: Left strap; B: Right strap; C: Back buckle;
D: Top buckle.
1 Lay out the four parts of the headgear as
shown in (E-1). The panels must face up.
Note: Before threading the straps, make
sure that the buckles are positioned as shown
in (E-2) and (E-3).
2 Thread the back straps through the back
buckle (part C) as shown in
(E-2a) and (E-2b).
3 Thread the top straps through the top
buckle (part D) as shown in
(E-3a) and (E-3b).
60872r4.book Page 4 Friday, November 4, 2005 9:31 AM