


13
T
R
O
U
B
L
E
S
H
O
O
T
I
N
G
SAFETY INSPECTION/TROUBLESHOOTING PROCEDURE 2
S
A
F
E
T
Y
I
N
S
P
E
C
T
I
O
N
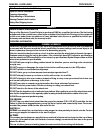
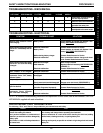
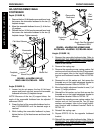
TROUBLESHOOTING - ELECTRICAL
NOTE: For additional troubleshooting information and explanation of error codes, refer to the individual CONTROL-
LER MANUAL supplied with each wheelchair.
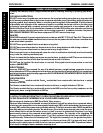
SYMPTOM
Battery won't charge.
Batteries draw excessive current
when charging.
Battery indicator flashes the charge
level is low—immediately after re-
charge.
Battery indicator flashes the charge
level is low—too soon after being
recharged.
Motor “chatters” or runs irregular.
Wheelchair does not respond to
commands. Power "ON", battery
indicator flashes.
Only one (1) rear wheel turns.
Joystick erratic or does not re-
spond as desired.
Wheelchair does not respond to
commands. Power indicator
OFF—even after recharging.
SOLUTIONS
Replace fuse (PROCEDURE 6).
Check batteries for shorted cell. Replace if nec-
essary (
BATTERIES-PROCEDURE 11).
Contact Dealer/Invacare for Service.
Check batteries for shorted cell. Replace if nec-
essary (BATTERIES-PROCEDURE 11).
Contact Dealer/Invacare for Service.
Poor connections between charger and wheel-
chair. Contact Dealer/Invacare for Service.
Have charger checked.
Replace batteries if necessary (BATTERIES-PRO-
CEDURE 11).
Contact Dealer/Invacare for Service.
Contact Dealer/Invacare for Service.
Engage motor locks/clutches (PROCEDURE 8).
Contact Dealer/Invacare for Service.
Engage motor lock/clutch (PROCEDURE 8).
Contact Dealer/Invacare for Service.
Contact Dealer/Invacare for Service.
Clean terminals (
BATTERIES-PROCEDURE 11).
Contact Dealer/Invacare for Service.
PROBABLE CAUSE
Blown Fuse.
Battery failure.
Electrical malfunction.
Battery failure.
Malfunctioning battery charger.
Electrical malfunction.
Batteries not charged.
Weak batteries.
Electrical malfunction.
Electrical malfunction.
One (1) or both motor locks/clutches
disengaged.
Electrical malfunction.
One (1) motor lock/clutch is disengaged.
Electrical malfunction.
Controller Programed improperly.
Poor battery terminal connection.
Electrical malfunction.
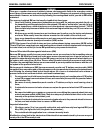
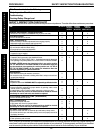
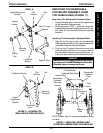
TROUBLESHOOTING - MECHANICAL
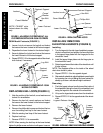
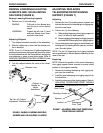
SOLUTIONS
If pneumatic, check tires for cor-
rect and equal pressure.
Check for loose stem nuts/bolts.
Check that both casters contact
ground at the same time.
Check that both stabilizer wheels
are adjusted to the same height.
CHAIR 3
WHEELS
X
LOOSENESS
IN CHAIR
X
SQUEAKS AND
RATTLES
X
CASTERS
FLUTTER
X
X
X
SLUGGISH TURN/
PERFORMANCE
X
X
CHAIR VEERS
LEFT/RIGHT
X
X
X
X
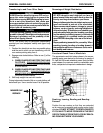
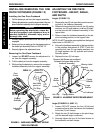
Don’t perform any installation or maintenance
without first reading this manual.
Don’t perform installation or maintenance of
batteries in an area that could be damaged by
battery spills.
Don’t make it a habit to discharge batteries to
the lowest level.
Read and understand this manual and any service information that accompa-
nies a battery and charger before operating the wheelchair.
Move the wheelchair to a work area before checking the fluid level, adding
distilled water, cleaning terminals, or opening battery box.
Recharge as frequently as possible to maintain a high charge level and extend
battery life.
DON’T DO
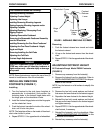
CHECKING BATTERY CHARGE LEVEL
The following “Do’s” and “Don’ts” are provided for your convenience and safety.