


Chapter 17
Starting the Applications
At this point, the Learning Management System applications are ready to start. The WAS admin console is used to
start these applications. Both the WAS logs and Learning Management System logs should be examined to verify
correct initialization. At this point, the applications can be accessed via browser. The administrator identified during
installation must login to the Learning Management System application and roster users, provide for importing
content, and otherwise perform the tasks needed for actual learning to be delivered to users. The following
information provides more details on starting the applications.
Starting the Learning Management System Server application
After the Learning Management System Server has been installed, the application can be started.
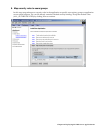
1. Go to the WAS Enterprise Application selection at the Administrative Console.
2. Click the Learning Management System Server checkbox.
3. Click Start. After a short time for startup-processing, the display will update to show the new application
status.
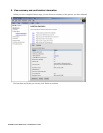
4. Once the application is deployed, click on it in the Applications window.
5. In the application’s window (for example, the “Learning Management System” window in the current
example), scroll down and click the “View Deployment Descriptor” link. Expand the + sign next to “Web
Modules” and expand the + sign next to the specific Web module for the application.
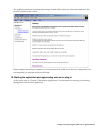
6. Make a note of the “Context-root.” Appended to your WAS server’s hostname, this value forms the URL for
your application. For example, if the Context root for your Learning Management System Server application
is lms-lmm and you deployed it to a WAS server called xyz.acme.com, the publishable URL for the Learning
Management System is
http://xyz.acme.com/lms-lmm (case-sensitive).
7. To verify that the Learning Management System Server is running properly, simply enter
http://xyz.acme.com/lms-lmm in a browser.
Starting the Delivery Server application
After the Delivery Server has been installed, the application can be started.
1. Go to the WAS Enterprise Application selection at the Administrative Console.
2. Click the Delivery Server checkbox.
3. Click Start. After a short time for startup-processing, the display will update to show the new application
status.
4. Once the application is deployed, click on it in the Applications window.
5. In the application’s window (for example, the “Delivery Server” window in the current example), scroll
down and click the “View Deployment Descriptor” link. Expand the + sign next to “Web Modules” and
expand the + sign next to the specific Web module for the application.
6. Make a note of the “Context-root.” Appended to your WAS server’s hostname, this value forms the URL for
your application. For example, if the Context root for your Delivery Server application is lms-ds and you
deployed it to a WAS server called xyz.acme.com, the publishable URL for the Delivery Server is
http://xyz.acme.com/lms-ds (case-sensitive).
Chapter 17: Starting the Applications 89