


3G Storm Series
®
Wheelchairs 36 Part No. 1104849
SEAT FRAMESECTION 6
SEAT FRAME
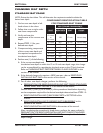
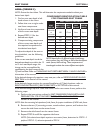
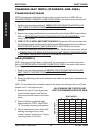
ALLOWABLE SEAT WIDTH AND
DEPTH COMBINATIONS FOR ASBA
12 13 14 15 16
12 ✓✓✓✓✓
13 ✓✓✓✓✓
14 ✓✓✓✓✓
15 ✓✓✓✓✓
16 ✓✓✓✓✓
17 N/A N/A ✓✓✓
18 N/A N/A ✓✓✓
19 N/A N/A ✓✓✓
20 N/A N/A ✓✓✓
21 N/A N/A ✓✓✓
22 N/A N/A ✓✓✓
SEAT WIDTH
SEAT DEPTH
CHANGING SEAT WIDTH (STANDARD AND ASBA)
STANDARD SEAT FRAME
NOTE: If changing seat width below 16-inches wide, you must convert to an ASBA. Refer to
CONVERTING FROM STANDARD TO ASBA OR VICE VERSA in this section of the manual. For all
changes above 16-inches wide, perform the outlined steps.
1. Perform the instructions outlined in
PREPARATION FOR REMOVING/INSTALLING
SEAT FRAME (STANDARD FRAME, ASBA, AND VAN SEAT) in this section of the
manual.
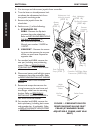
2. Remove the existing standard seat frame subassembly and install the NEW standard frame.
Refer to REMOVING/INSTALLING STANDARD SEAT FRAME SUBASSEMBLY in this
section of the manual.
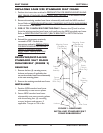
3. FOR 12 TO 15-INCH SEAT DEPTHS ONLY: Remove the CJ back brackets from
the existing standard seat frame and install onto the NEW standard seat frame. Refer to
REMOVING/INSTALLING CJ BACK BRACKETS in SECTION 8 of this manual.
4. Reinstall the components previously removed in STEP 1. Perform the instructions outlined
in PREPARATION FOR REMOVING/INSTALLING SEAT FRAME (STANDARD FRAME,
ADJUSTABLE FRAME, AND VAN SEAT) in this section of the manual.
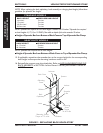
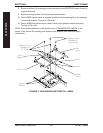
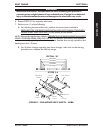
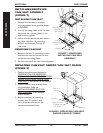
ASBA (FIGURE 5)
NOTE: If changing seat width above 16-inches wide, you must convert to a standard seat frame.
Refer to CONVERTING FROM STANDARD TO ASBA OR VICE VERSA in this section of the manual.
For all changes below 16-inches wide, perform the outlined steps.
1. Perform the instructions outlined in PREPARATION FOR REMOVING/INSTALLING
SEAT FRAME (STANDARD FRAME, ASBA, AND VAN SEAT) in this section of the
manual.
2. Review the following chart for the allowable seat width and seat depth combinations for
the ASBA.
NOTE: The seat widths and seat depths enclosed in the outlined box will require the use of CJ back
brackets and a 17-inch deep seat pan.
3. Remove the two (2) mounting screws,
coved washers, spacers, and locknuts
that secure the side frame to the center
frame.
4. Adjust side frame to desired width
determined from STEP 2. See DETAIL
“A” for proper mounting hole position.
5. Secure side frame to center frame with
existing mounting screws, coved
washers, spacers, and locknuts. Torque
mounting screws to 75 in-lbs.